Set up Pricing Groups: Configure Product and Service Markups
In this article
Use a Pricing Group to add markup to products, adjust service prices, or charge different markups at different quantities. Apply the group to a quote or sales order, then check the price breakdown to see what changed.
A markup adds to the starting price: a $5 product with a 35% markup sells for $6.75 before services. A markup percentage is different from a margin percentage.
The example below uses Harbor Festival Pricing, a saved Festival Mug product with a $5 base price, and a Festival Printing service. Use your own names and prices when setting up your group.

The group can apply both rule types to the same quote row. Select it in Overview, save it, then check Unit Price.
Check your starting prices
-
Check the base price of the product you want to mark up. This walkthrough uses a saved product with a Price of $5.00.
Product rules have separate Catalog Product and Custom Product actions. Catalog products come from a supplier catalog. The Custom Product action covers products saved in your own product list, including products with variants.
Use + Product to add that saved product to the quote. A one-off line added with + Custom, a customer-supplied item, or a manually overridden product price does not follow the normal product markup rule.
-
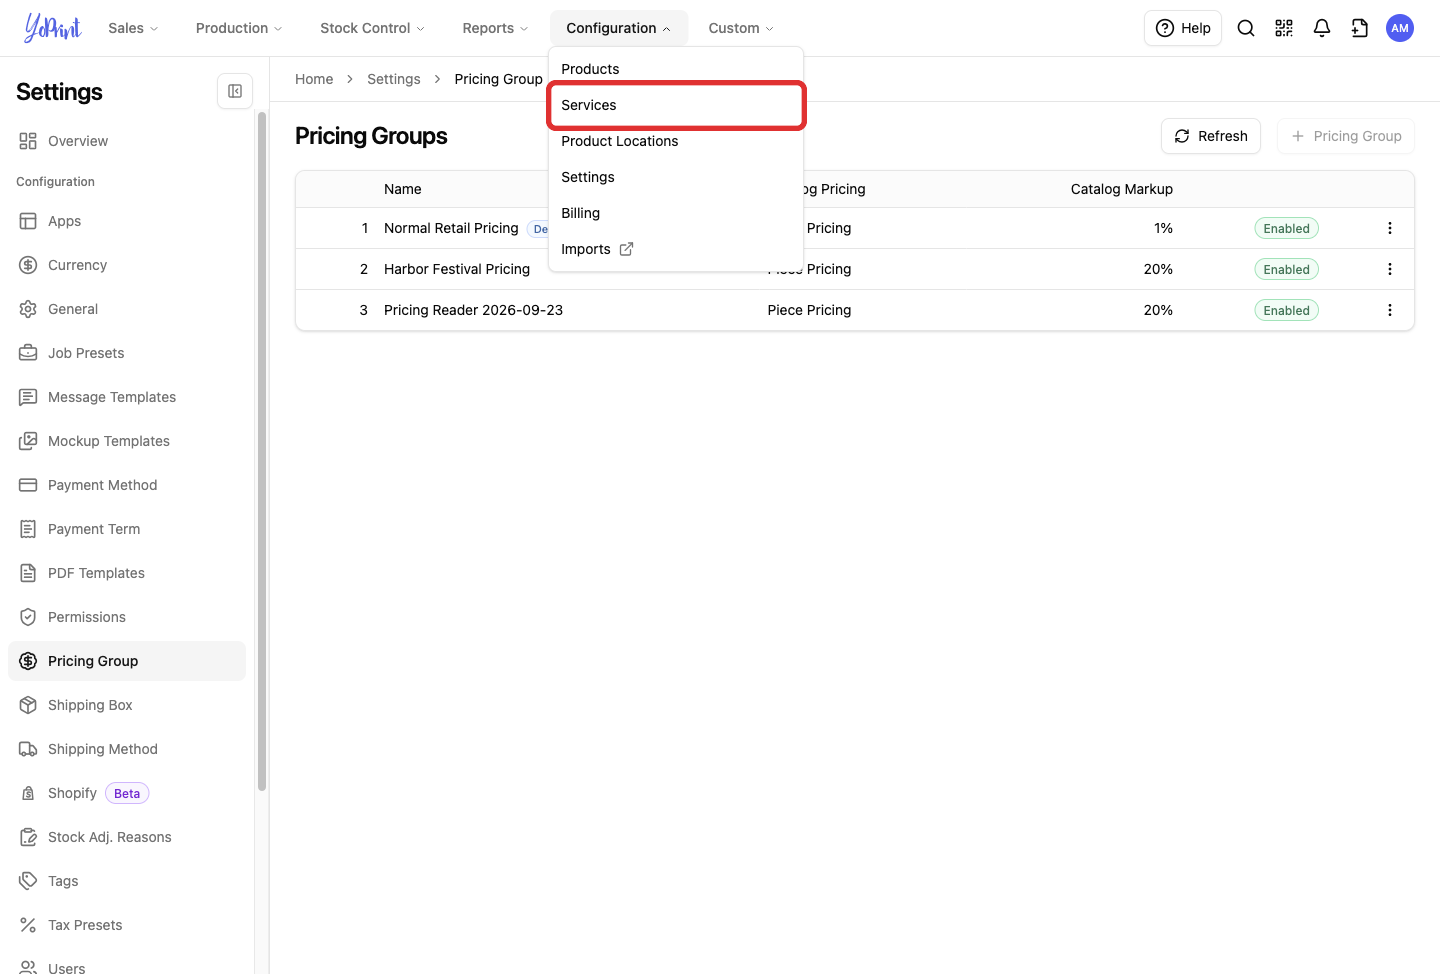
If you charge for a service, open Configuration → Services and select the service you want to use.
-
Check its pricing matrix before adding another markup. To follow the service example, use Per-item pricing with one option, One color, and these quantity breaks:
Quantity starts at Service price per item 1 $2.00 25 $1.60 -
Click Add quantity break, enter 25 under Order size and 1.60 under One color, then click Save and close.
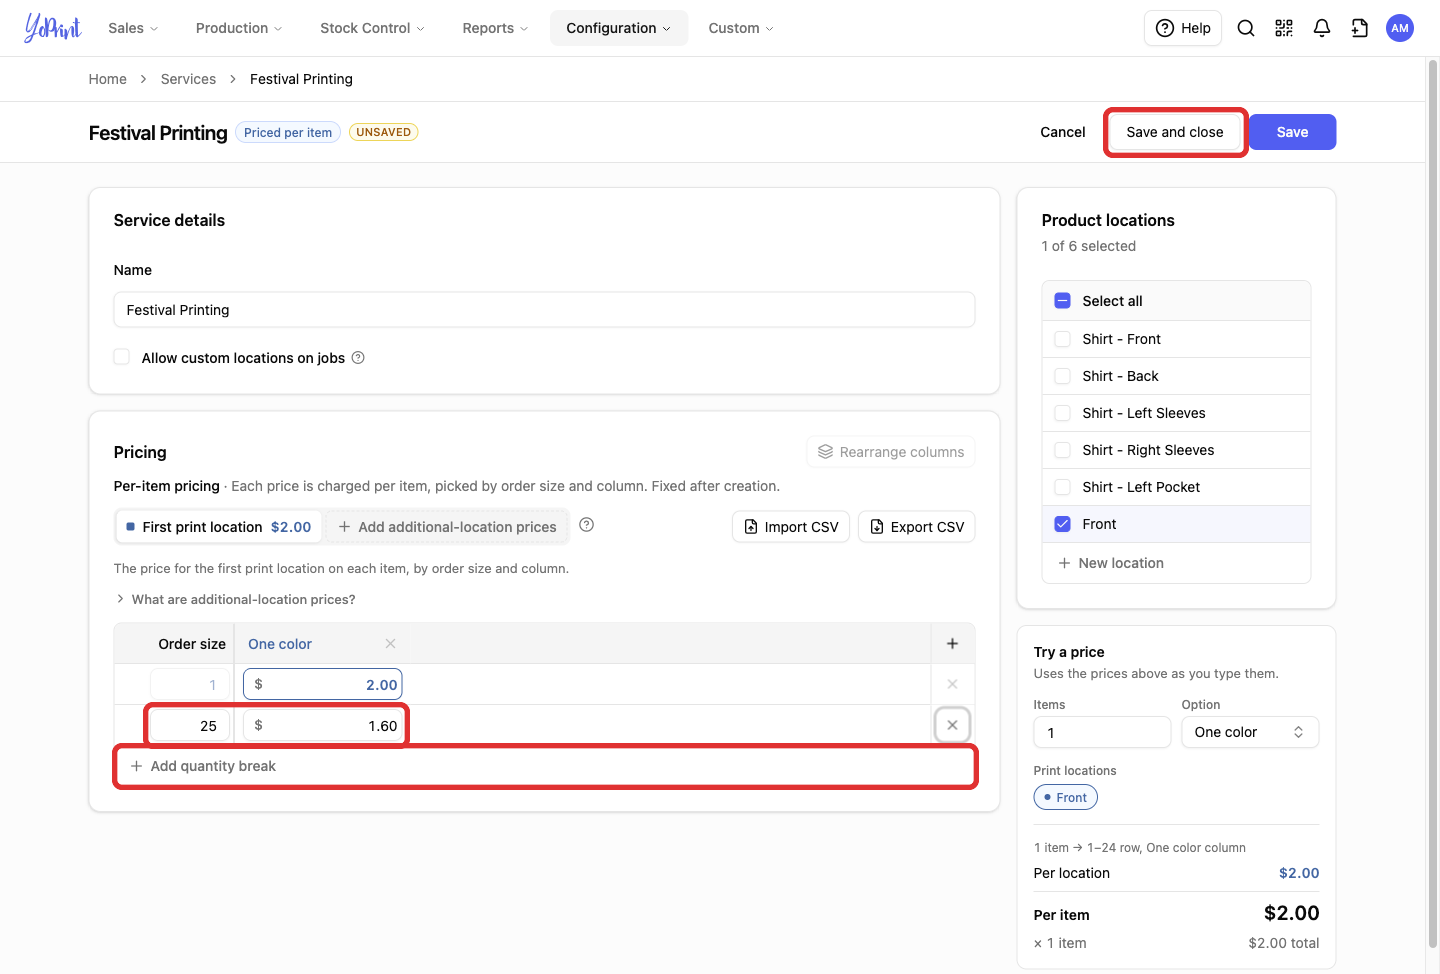
The matrix sets the service's starting price. A service rule can add another percentage to that price.
If your matrix already contains the price you want to charge, leave Enable Service Rules off in the pricing group. You do not need an extra service markup. See Remove an unwanted service markup to correct an existing group.
For a full matrix walkthrough, see Configure Pricing Matrix in YoPrint. For spreadsheet editing, see Import and Export Pricing Matrix as CSV.
Open a group and set catalog defaults
-
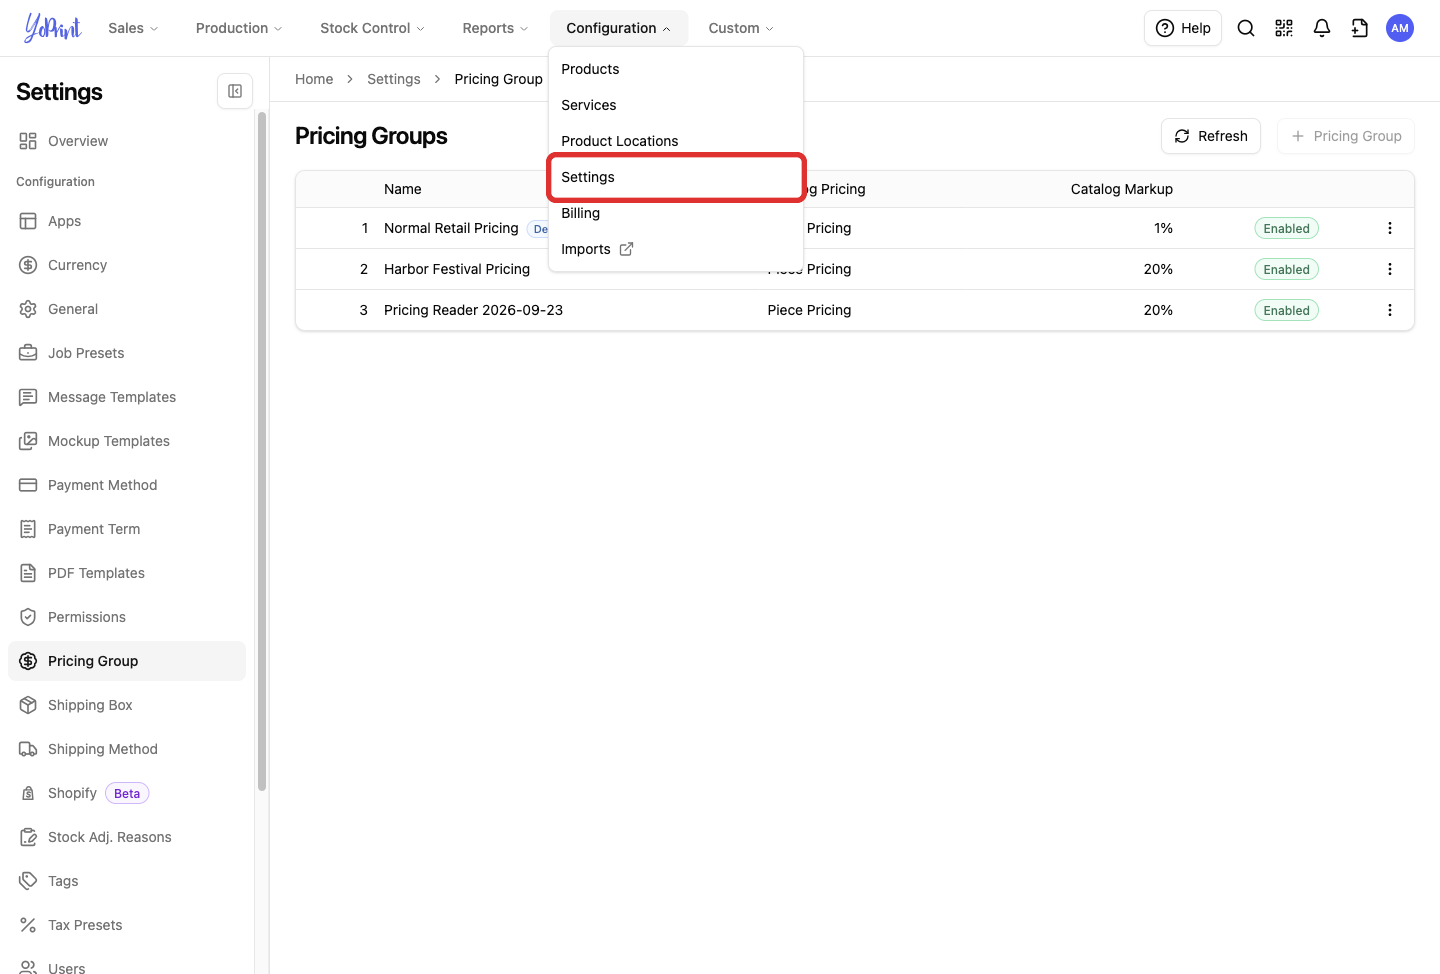
Open Configuration → Settings, then choose Pricing Group in the settings sidebar.
-
Click + Pricing Group.
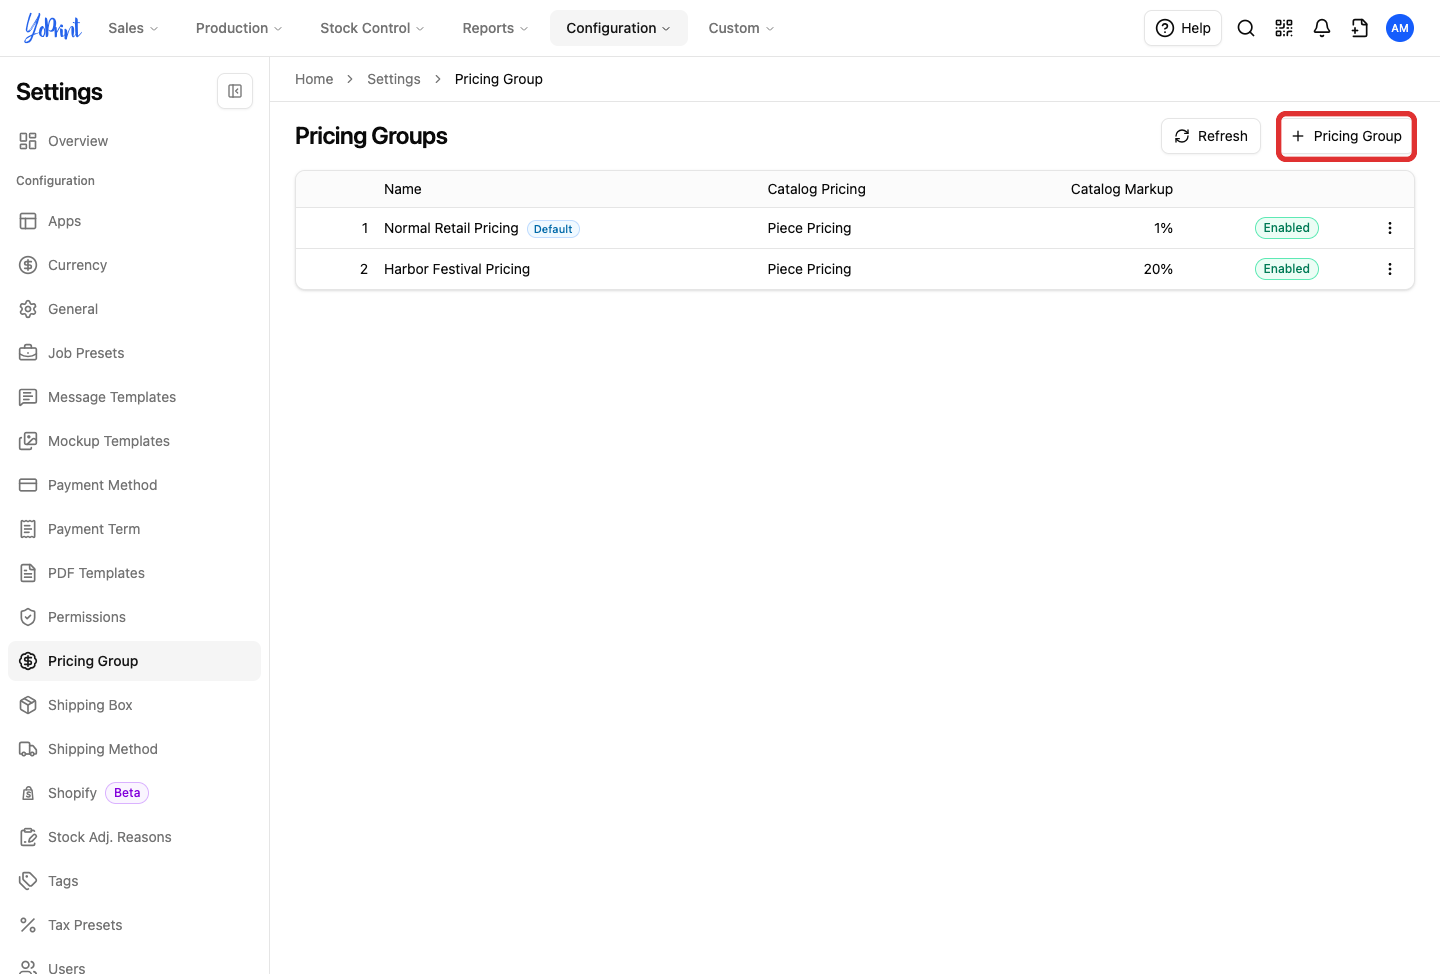
To change an existing group, open its three-dot More actions menu and choose Edit. If Draft Confirmation appears, choose Resume to keep working on the saved draft. New Draft discards that draft and starts again from the published group.

-
Enter a Pricing Group Name. The example uses Harbor Festival Pricing.
-
Under Default Catalog Price, choose Piece Pricing, Case Pricing, or Dozen Pricing. Use the supplier price you want as the starting point. The example uses Piece Pricing.
-
Enter a Default Catalog Markup percentage. Enter 20 for the example. A catalog item whose selected starting price is $5 would then have a $6 product price before services, unless a matching product rule changes it.
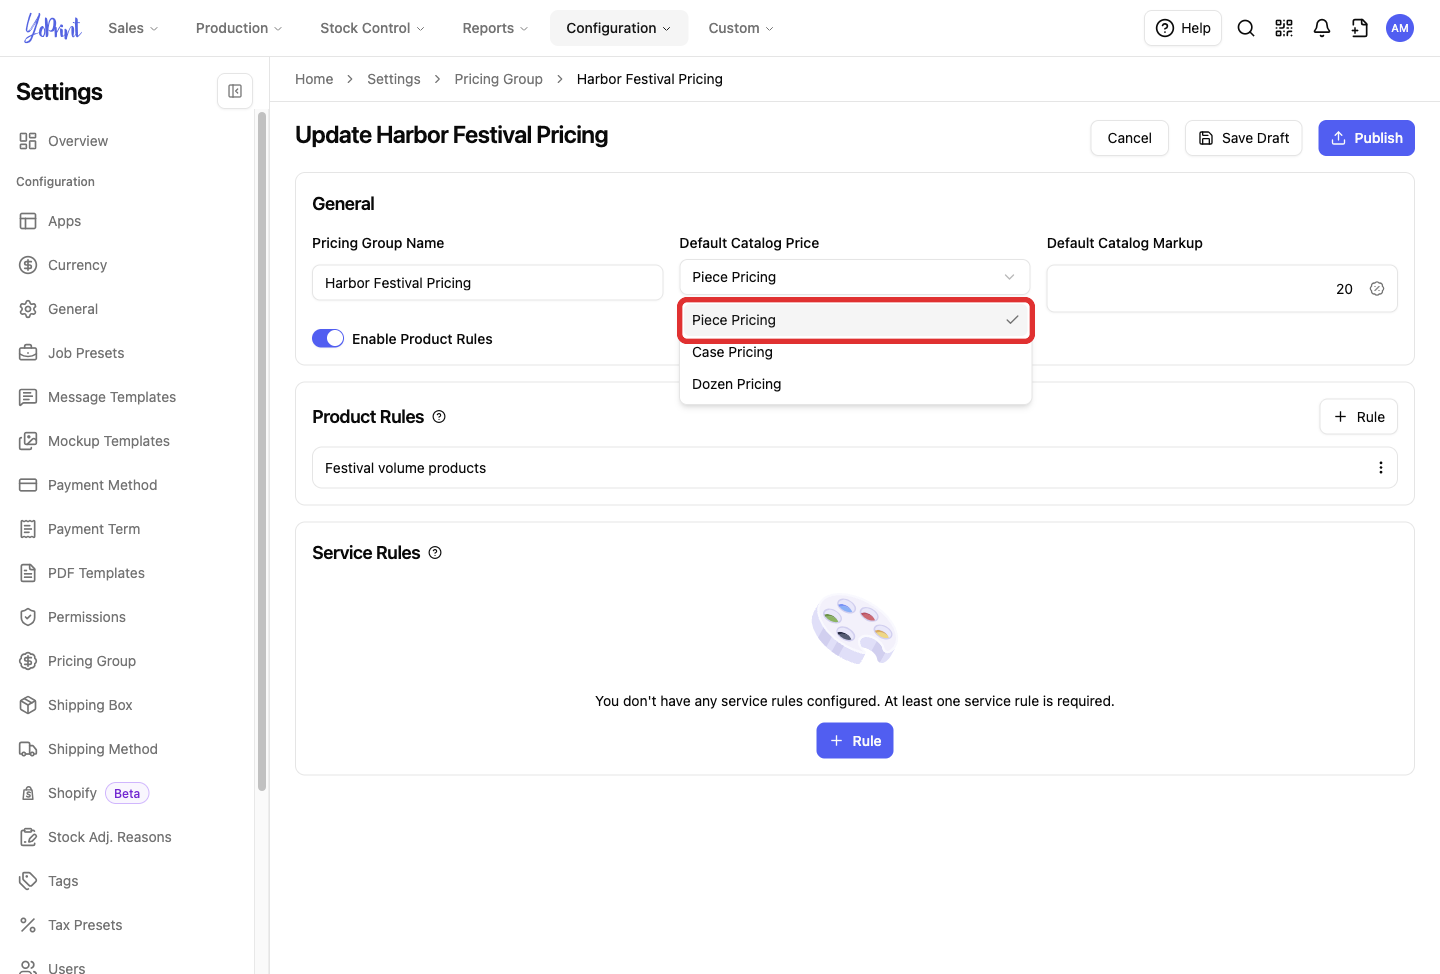
This default applies to catalog products. It does not add 20% to the saved Festival Mug product. Set that product's markup in a product rule.
If you only need the catalog default markup, leave Enable Product Rules off. Saved products keep their base prices. To add markup only to services, also set Default Catalog Markup to 0 and set up a service rule.
Add a product markup rule
-
Check that Enable Product Rules is on.
-
Click + Rule under Product Rules.
-
Enter a rule name. The example uses Festival volume products.
-
Choose the action for each product type. For this example, leave Catalog Product → Action set to Use Default Price. Under Custom Product, choose Use Markup (%) and enter 35 in Percentage.
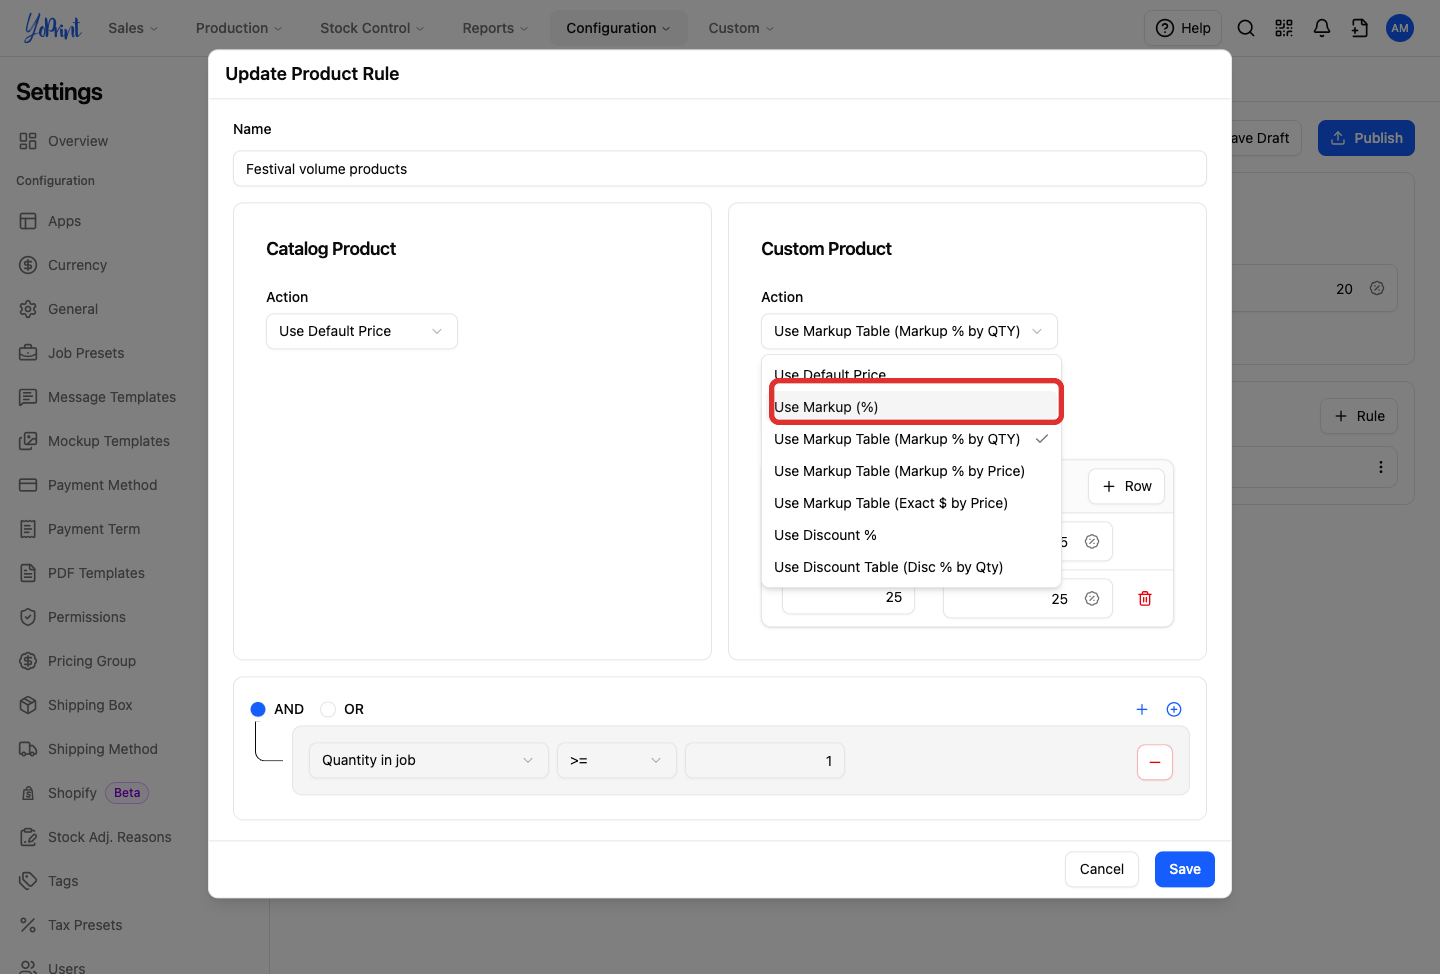
With Use Default Price, catalog products use the group's catalog defaults. Saved custom products use their base price. Choosing another markup action replaces that default behavior for the matching rule.
For a catalog-specific markup, choose the markup action under Catalog Product instead. Keep Custom Product → Action set to Use Default Price if you want saved products to keep their base prices.
-
Add at least one condition. Click the plain + at the right of the condition area and choose Quantity in job.
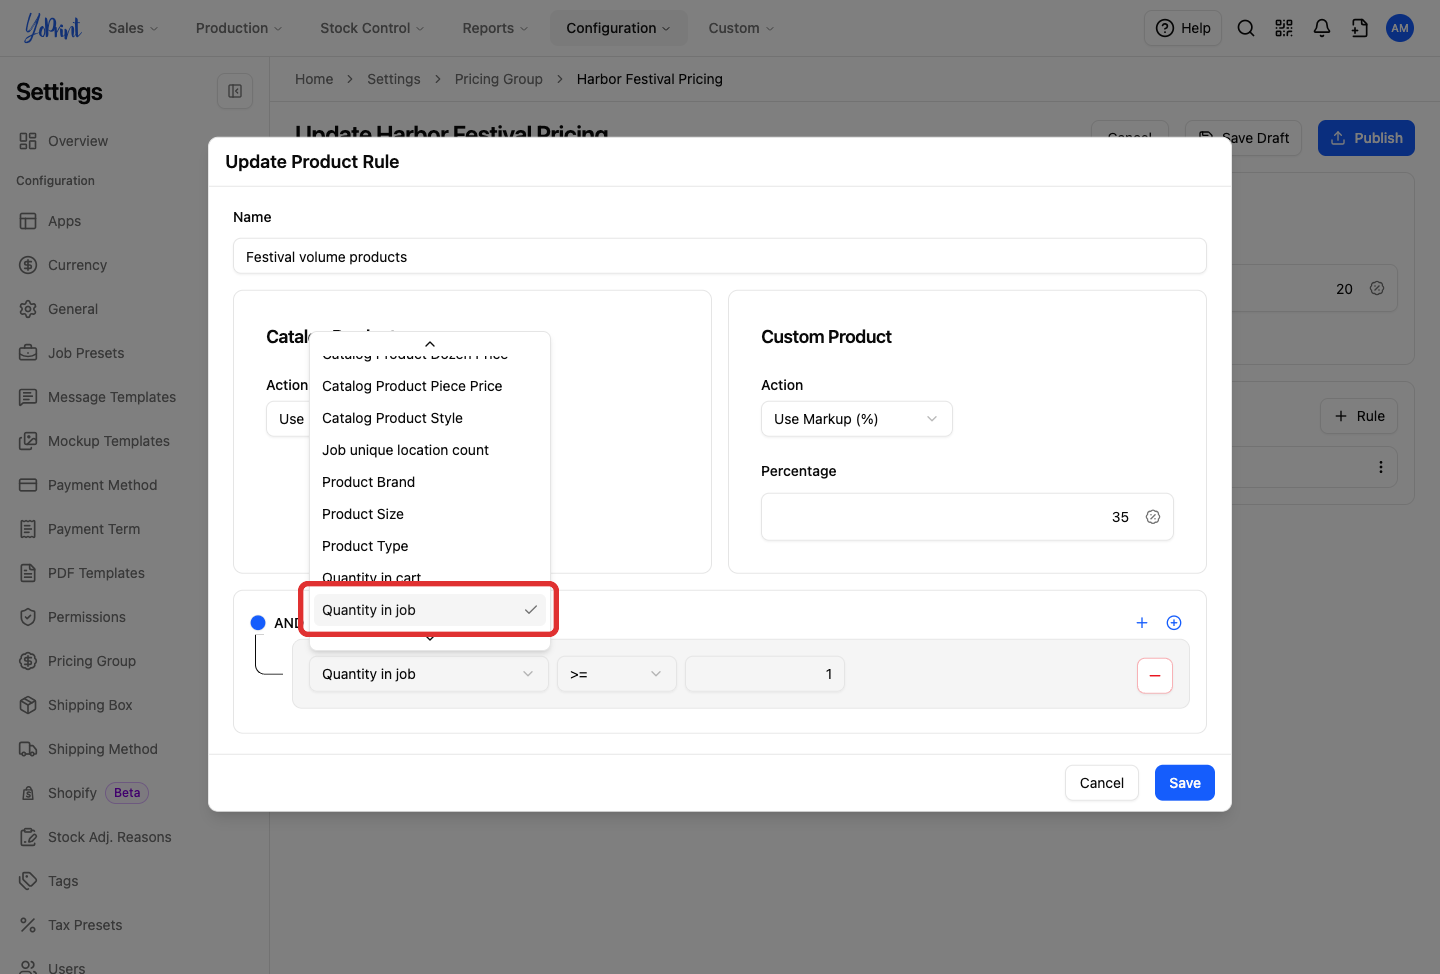
-
Choose >= and enter 1.
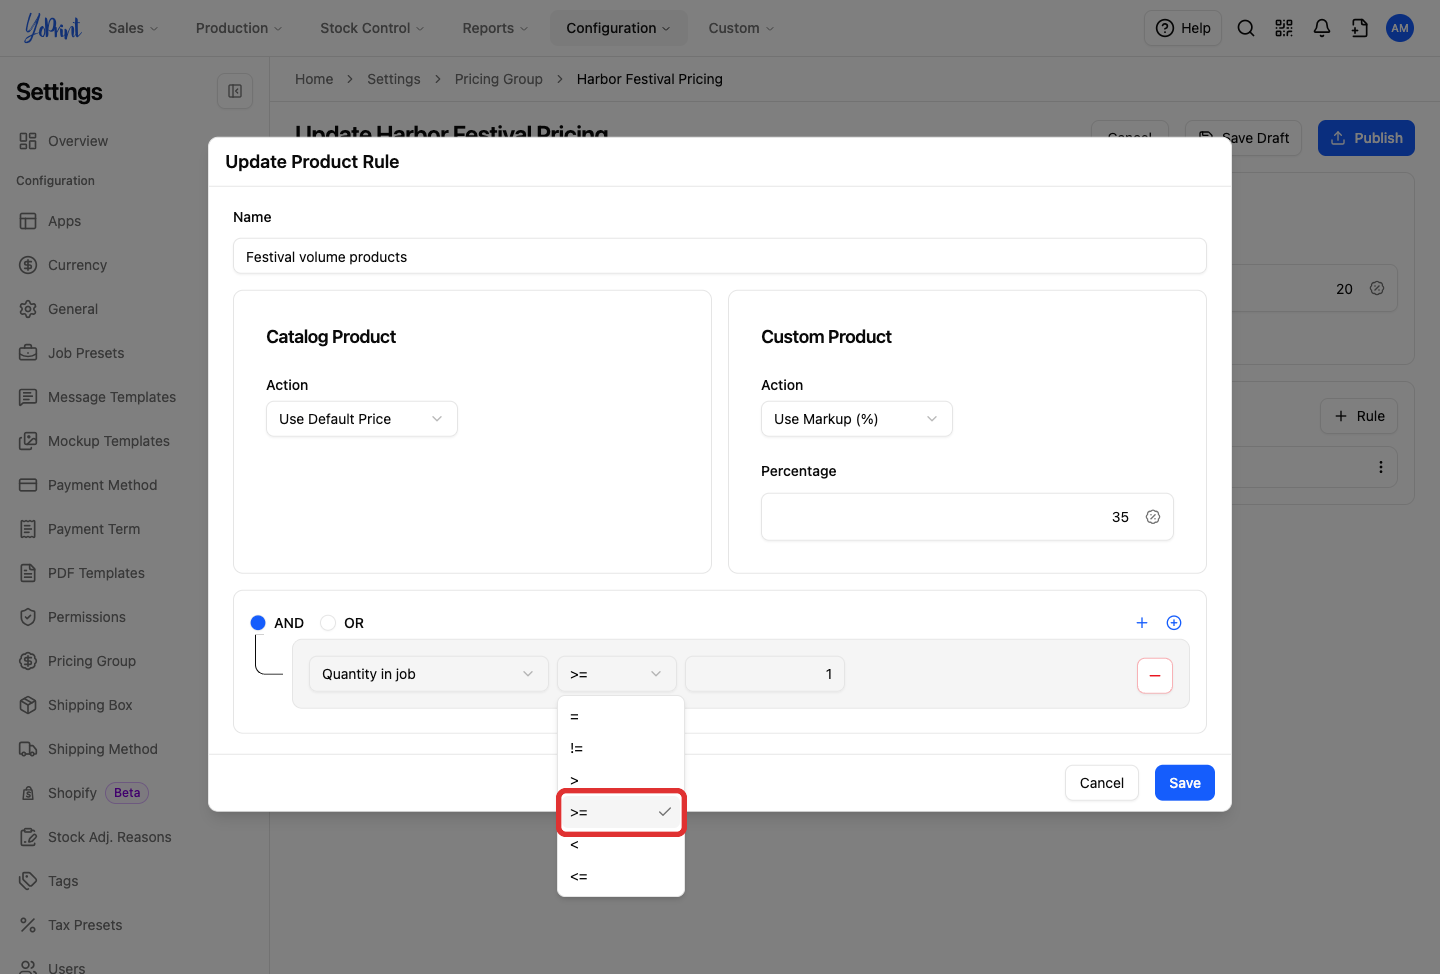
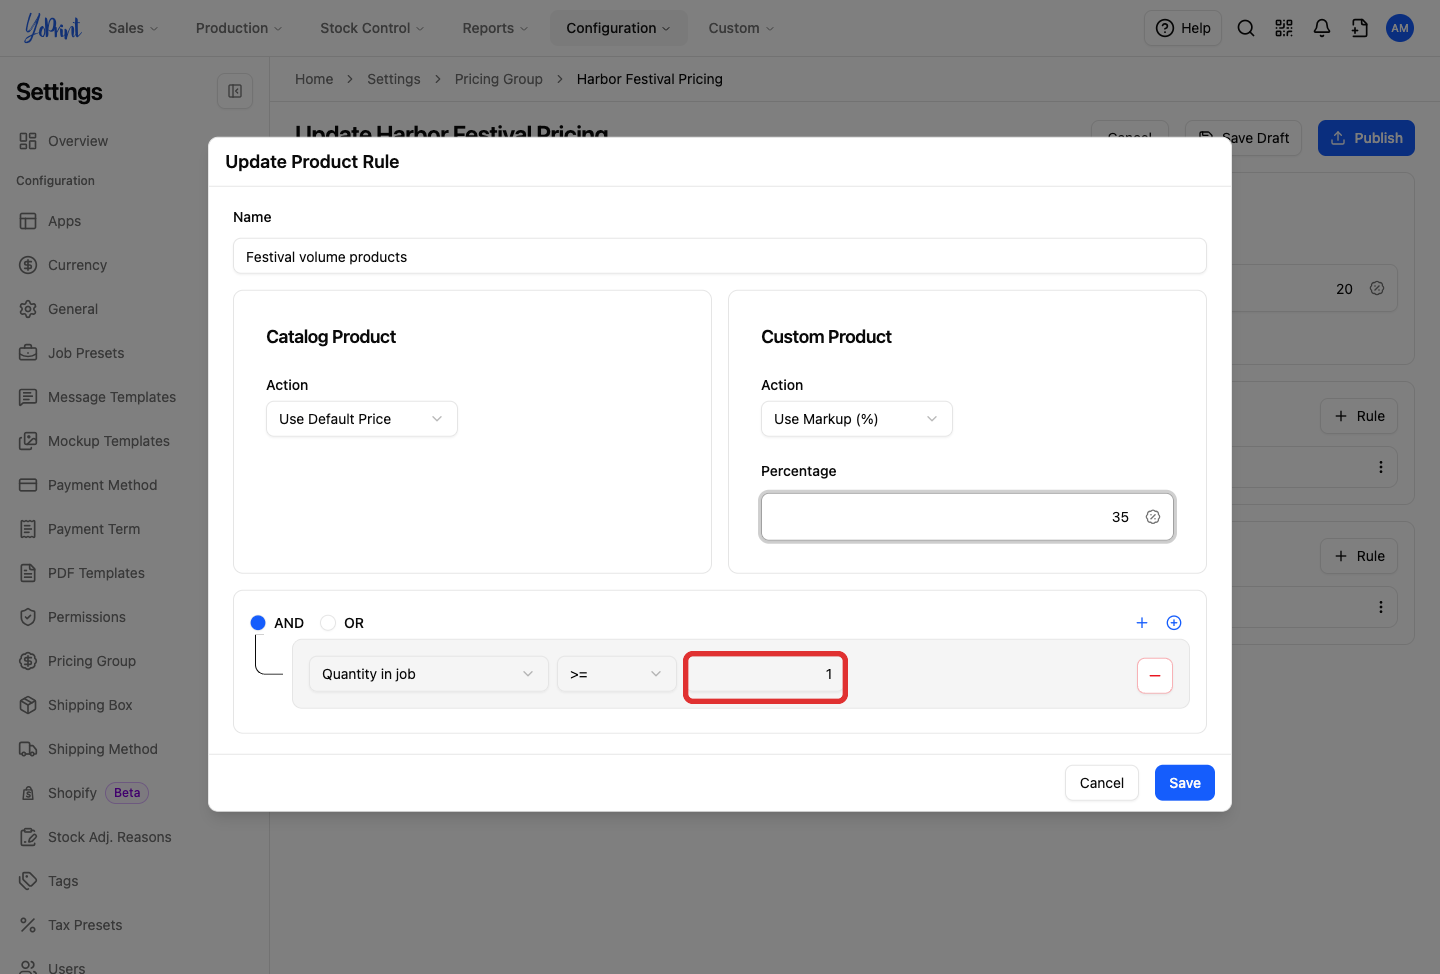
This condition matches any job containing at least one item.
To narrow the rule, add more conditions. Choose AND when all conditions must match, or OR when any condition may match. The circled + adds a separate condition group. Keep the condition simple until the price behaves as expected.
-
Click Save in the rule dialog.
The $5 saved product now has a rule that adds $1.75, giving a $6.75 product price when the group is applied. Saving this dialog returns you to the pricing group form. To follow the mug quantity example, continue to Change the markup at a quantity break before creating or publishing the group.
To keep the same markup at every quantity, skip the quantity and price tables. Continue to Add a service markup, then Save or publish the group. A flat markup does not change at 25 mugs; the later 25-mug comparison uses the quantity table.
Choose product conditions and operators
-
Click the condition field dropdown to choose a condition type.
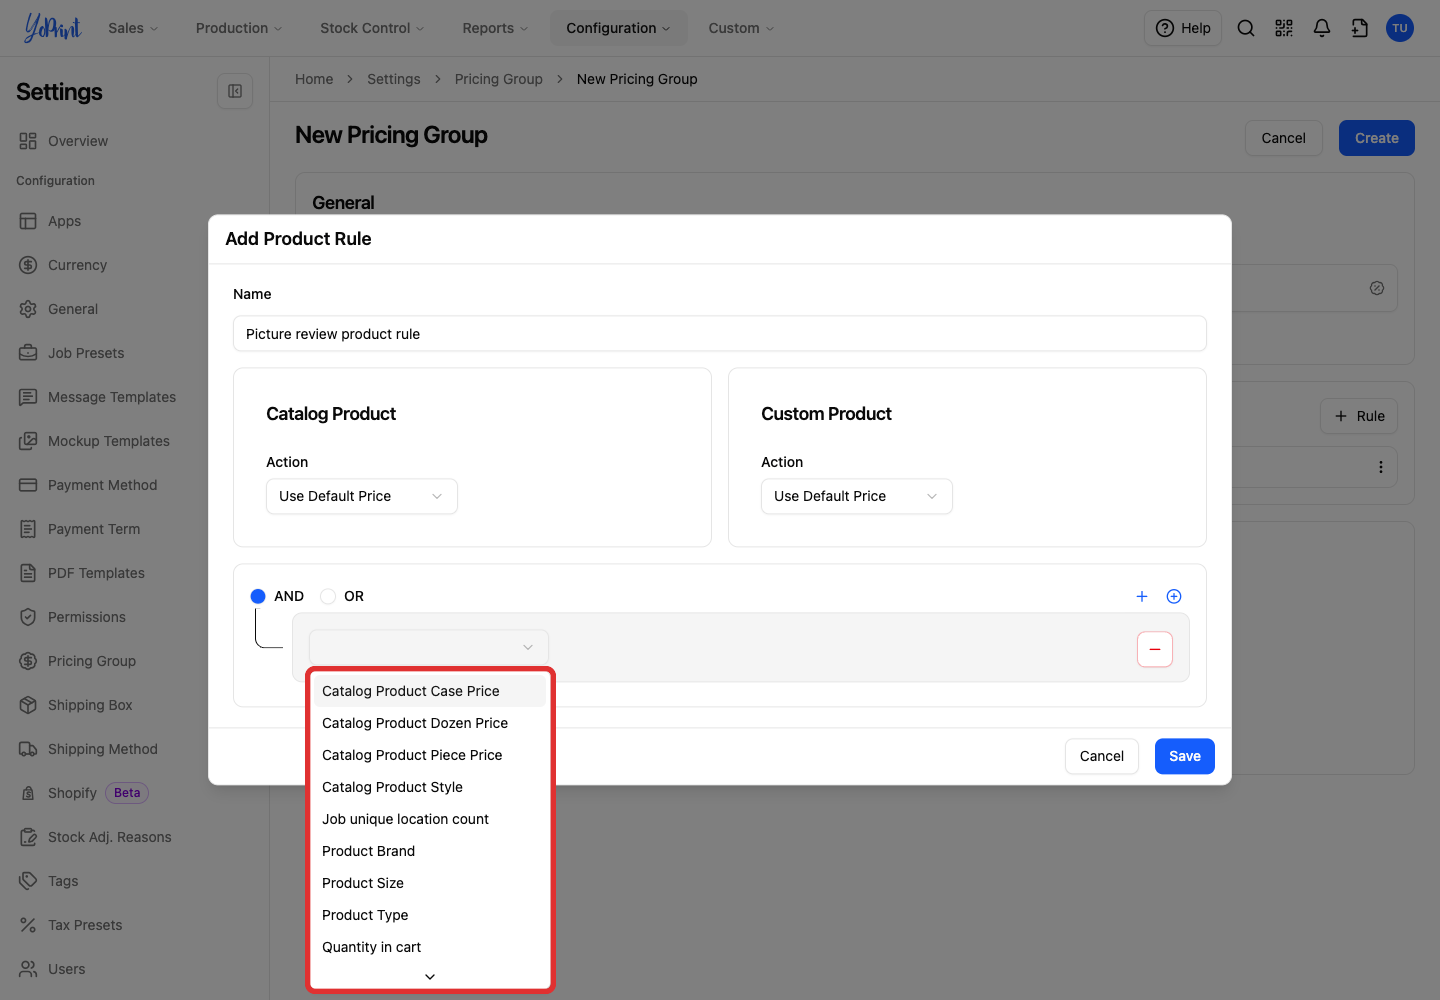
You can choose from 18 condition fields in the product rule editor:
- Catalog product case price
- Catalog product dozen price
- Catalog product piece price
- Catalog product style
- Job unique location count
- Product brand
- Product size
- Product type
- Quantity in cart
- Quantity in job
- Service
- Service location
- Service count
- Service location count
- Simple/variant product price
- Simple product
- Unique service count
- Variant product
-
For price and count conditions, choose an operator from =, !=, >, >=, <, or <=.
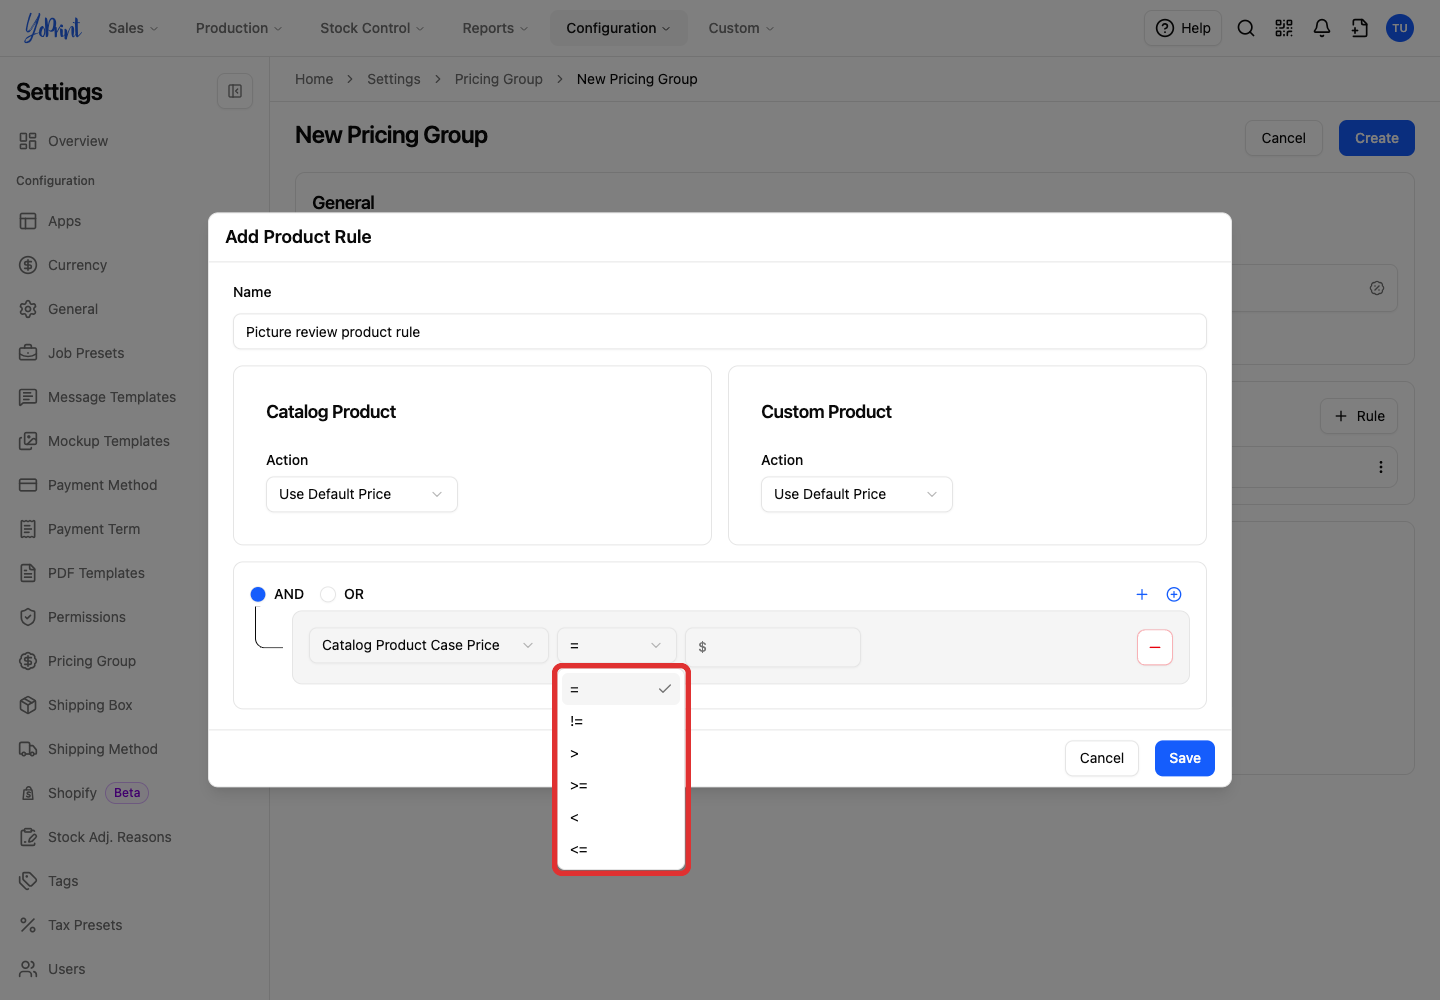
Price and count conditions use =, !=, >, >=, <, <=, while choices such as service, location, brand and product use Contains or Does not contain. Price and count conditions compare numbers: =** equals, != does not equal, **> is greater than, >= is greater than or equal to, < is less than, and <= is less than or equal to.
-
For text and selection choices such as brand, product, service, or location, choose Contains or Does Not Contain.
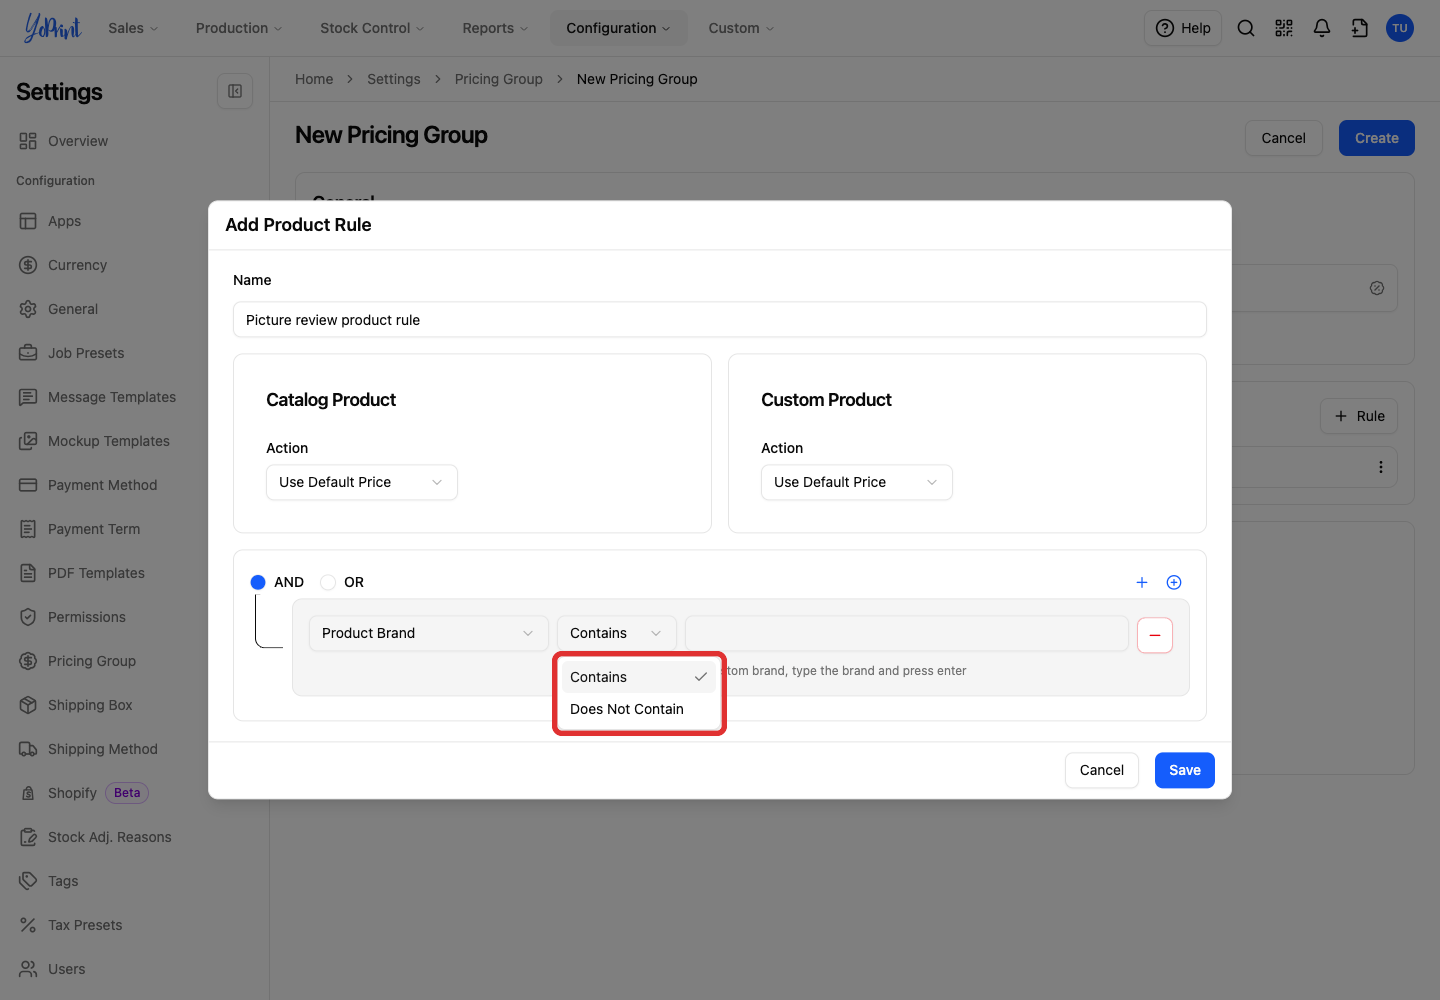
Selection choices match text: Contains matches when the field includes the specified text or option, while Does Not Contain matches when it does not.
Change the markup at a quantity break
-
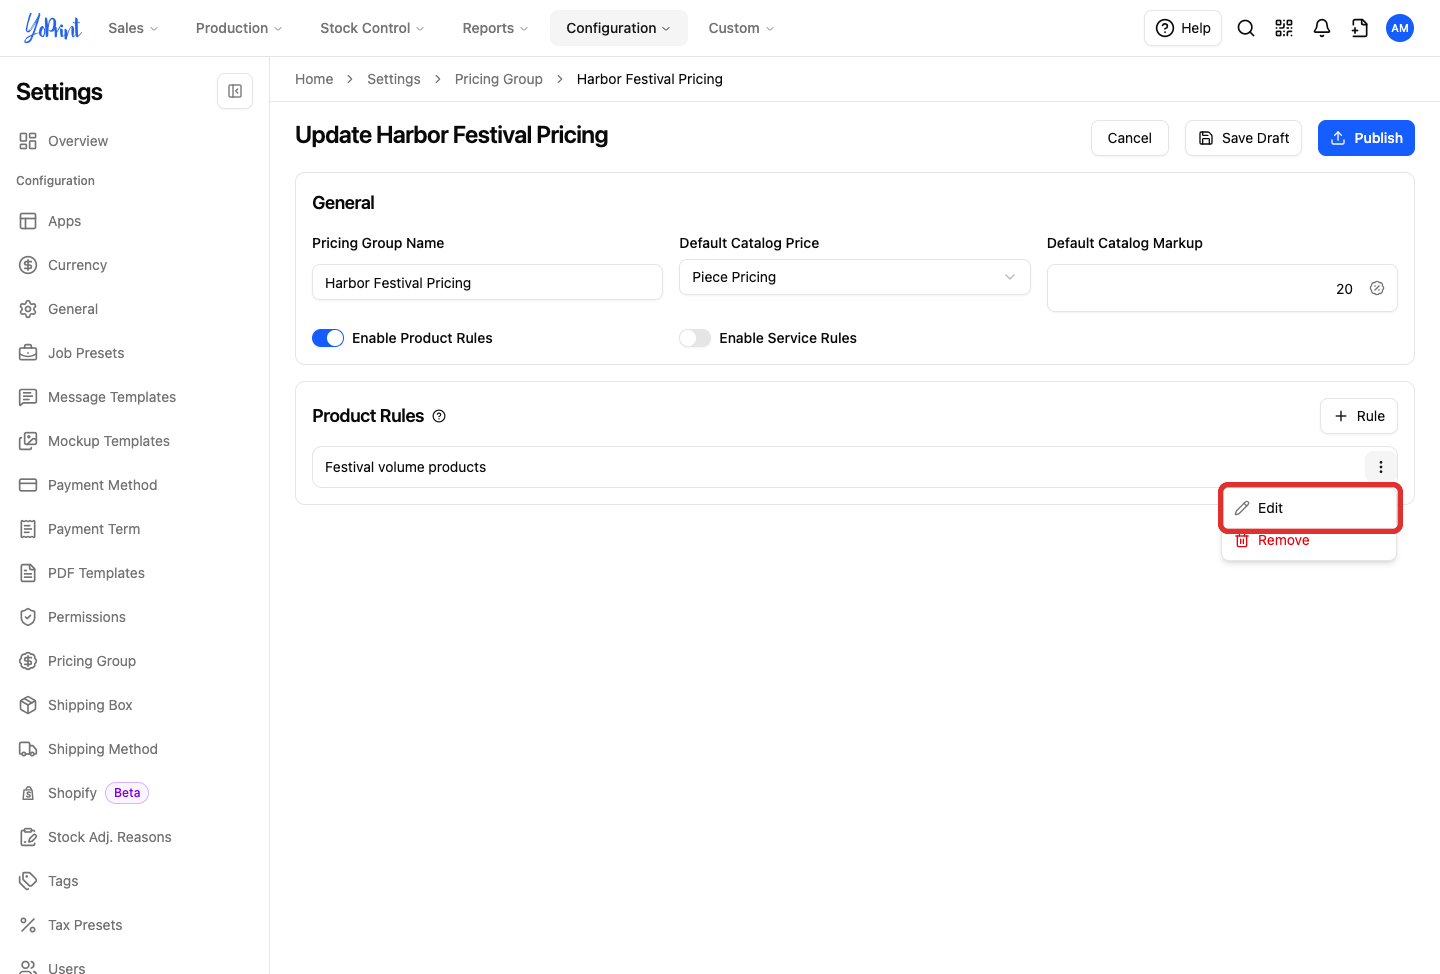
In Product Rules, open the rule's three-dot More actions menu and choose Edit.
-
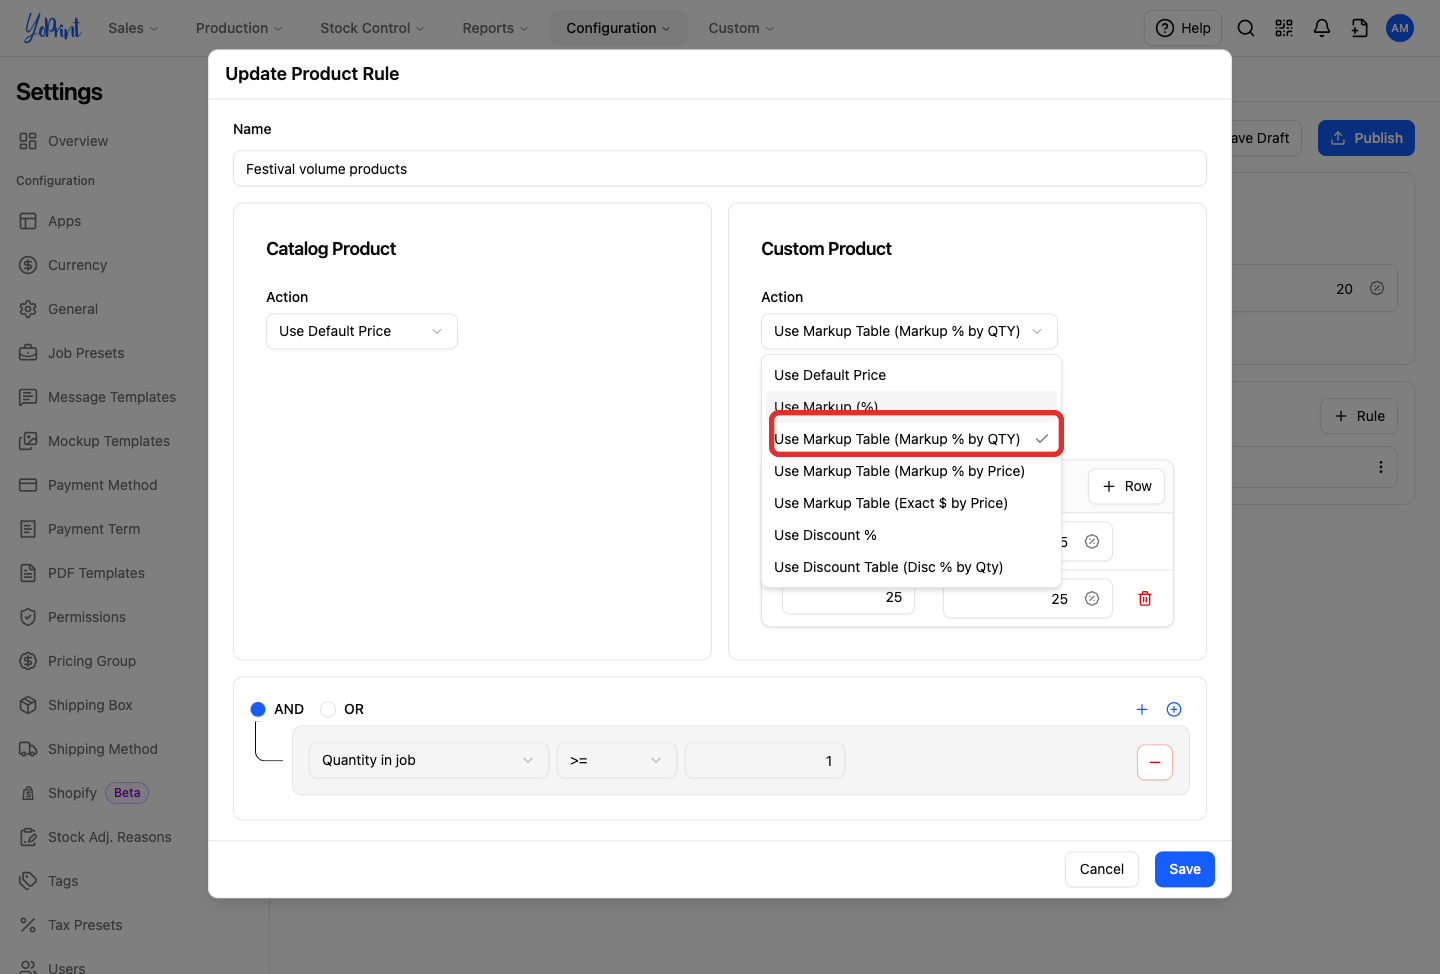
Under Custom Product, change Action to Use Markup Table (Markup % by QTY).
-
Set Based On to Line Item Quantity for the mug example.
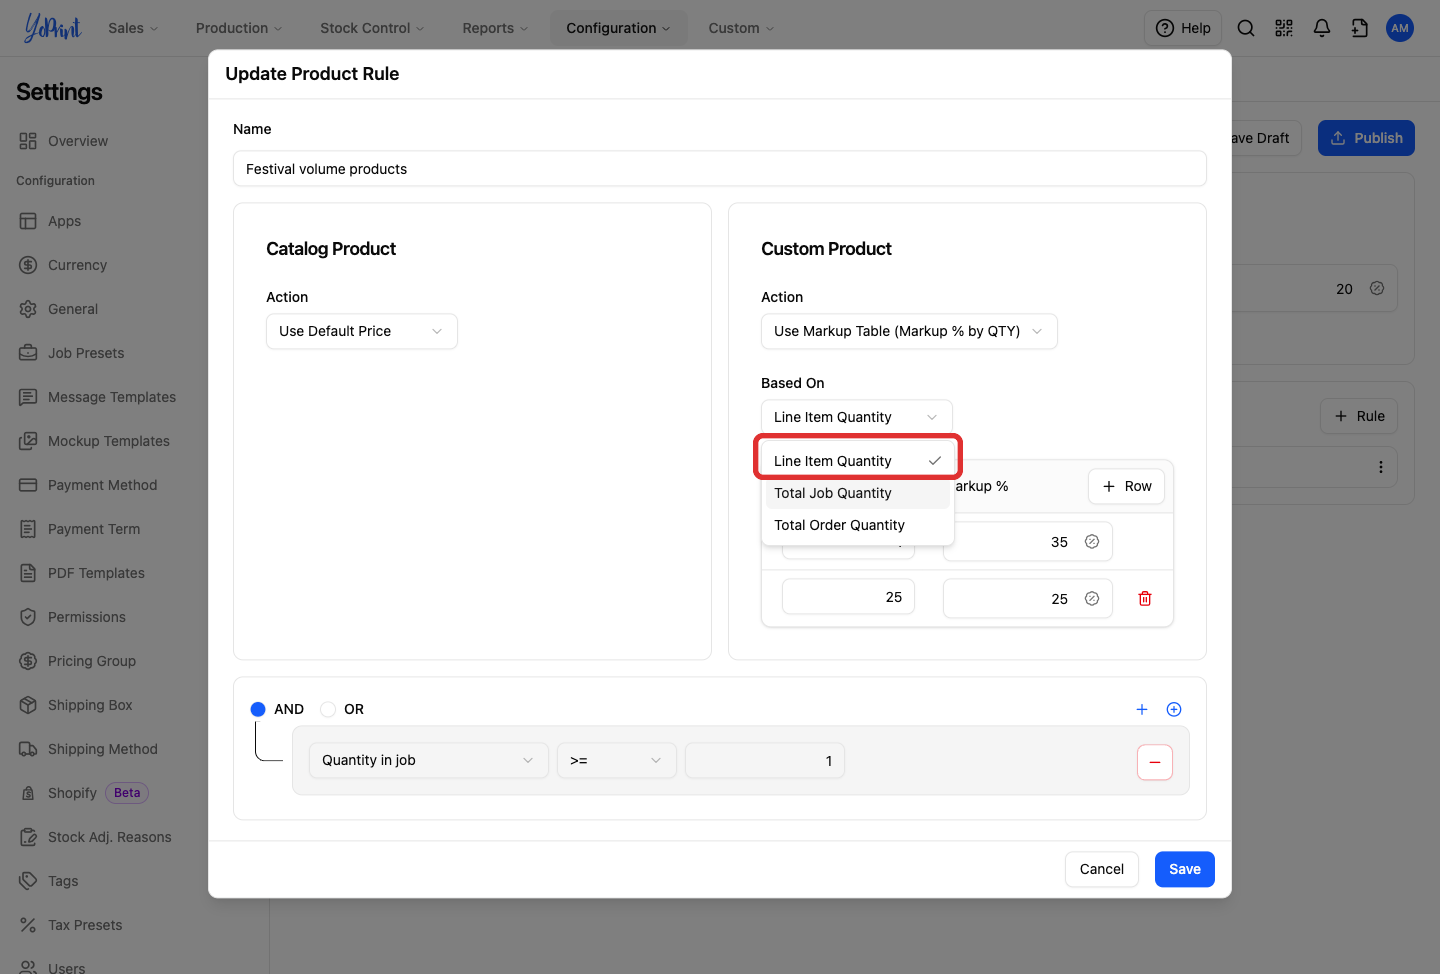
Based On Quantity used to choose the tier Line Item Quantity The quantity on that product line Total Job Quantity The combined product quantity in that job Total Order Quantity The combined product quantity across the order -
Enter 35 in the first row's Markup %.
-
Click + Row, enter 25 for Quantity, and enter 25 for Markup %.
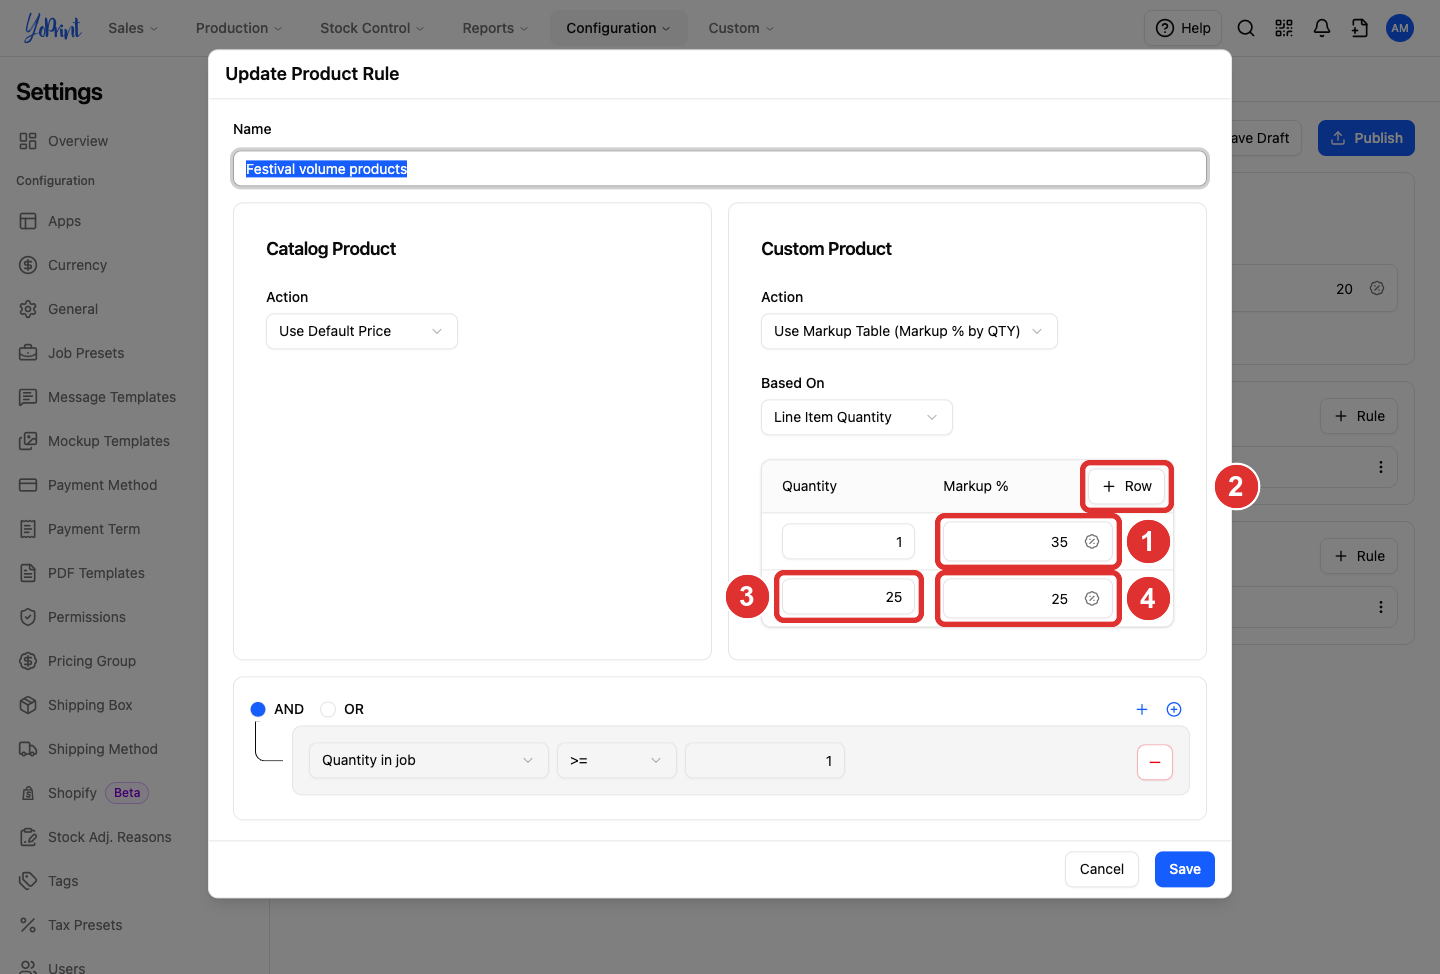
A tier starts at the quantity in its row and continues until the next tier. These rows apply 35% to quantities 1 to 24 and 25% from 25 onward. For the $5 mug, the product price changes from $6.75 to $6.25.
Enter quantity thresholds in increasing order, without duplicates. To remove a tier, click its trash icon.
-
Keep the Quantity in job >= 1 condition, then click Save.
Based On chooses the table's quantity. The condition decides whether the rule applies at all. They do different jobs, so check both.
To set product markups by price instead of quantity, see Use product-price tiers instead. To keep following the mug quantity example, continue to Add a service markup.
Use product-price tiers instead
Follow this section when the product's starting price should determine the markup. It replaces the quantity-based action on that side of the rule. To keep following the mug quantity example, skip to Add a service markup.
Add a percentage by price
-
Open the product rule's three-dot More actions menu and choose Edit.
-
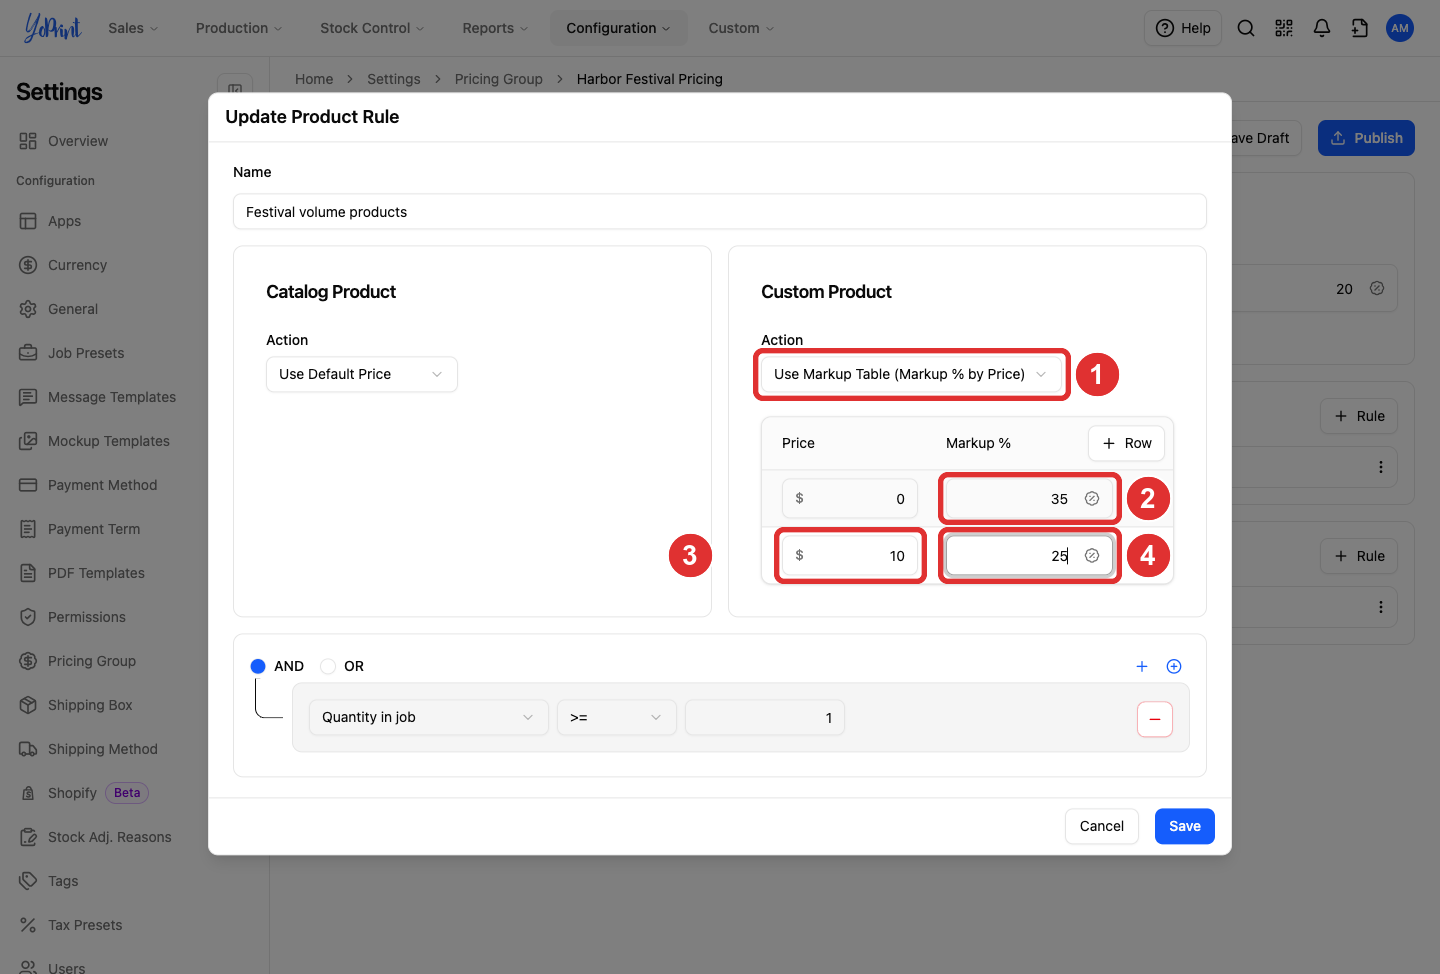
Under the product type you want to change, choose Use Markup Table (Markup % by Price).
-
Enter the markup for the first row, which starts at $0.
-
Click + Row to add the next price threshold and its markup.
In this example, enter 35% from $0 and 25% from $10. A $5 product uses 35%; a $10 product uses 25%.
-
Check the rule's conditions, then click Save.
Add a dollar amount by price
-
Open the product rule's three-dot More actions menu and choose Edit.
-
Under the product type you want to change, choose Use Markup Table (Exact $ by Price).
-
Enter the amount in Markup Value for the first row starting at $0.
-
Click + Row to add more price thresholds.
The example adds $1.75 from a starting price of $0, and $2.00 from $10.
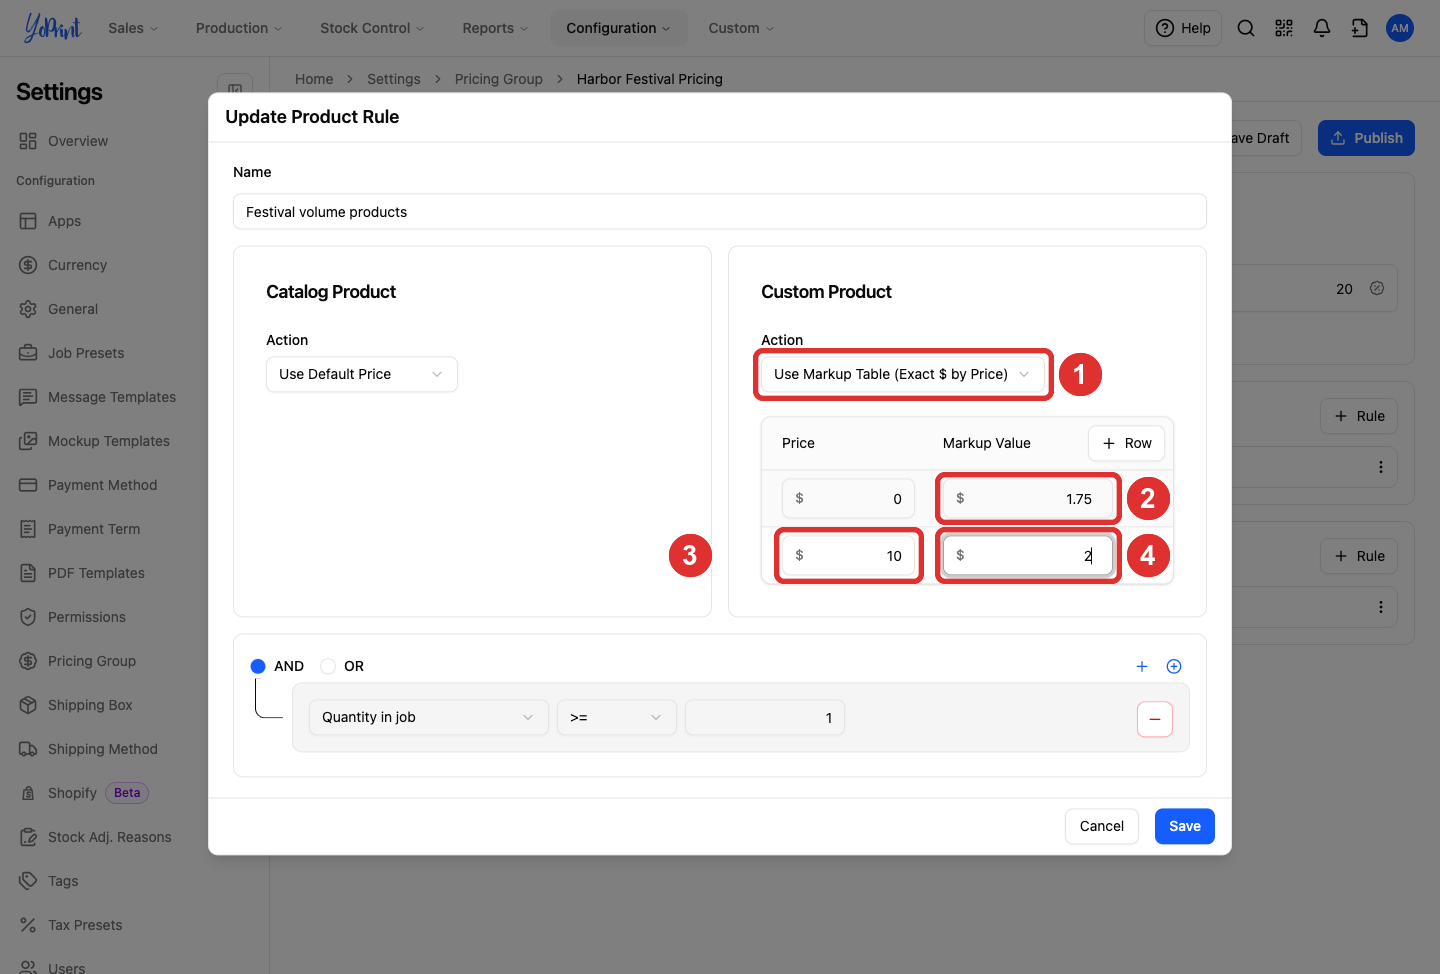
Markup Value is an amount to add to the base price, not the final selling price. A $5 product plus a $1.75 markup has a $6.75 product price before services.
-
Check the rule's conditions, then click Save.
Discount a product
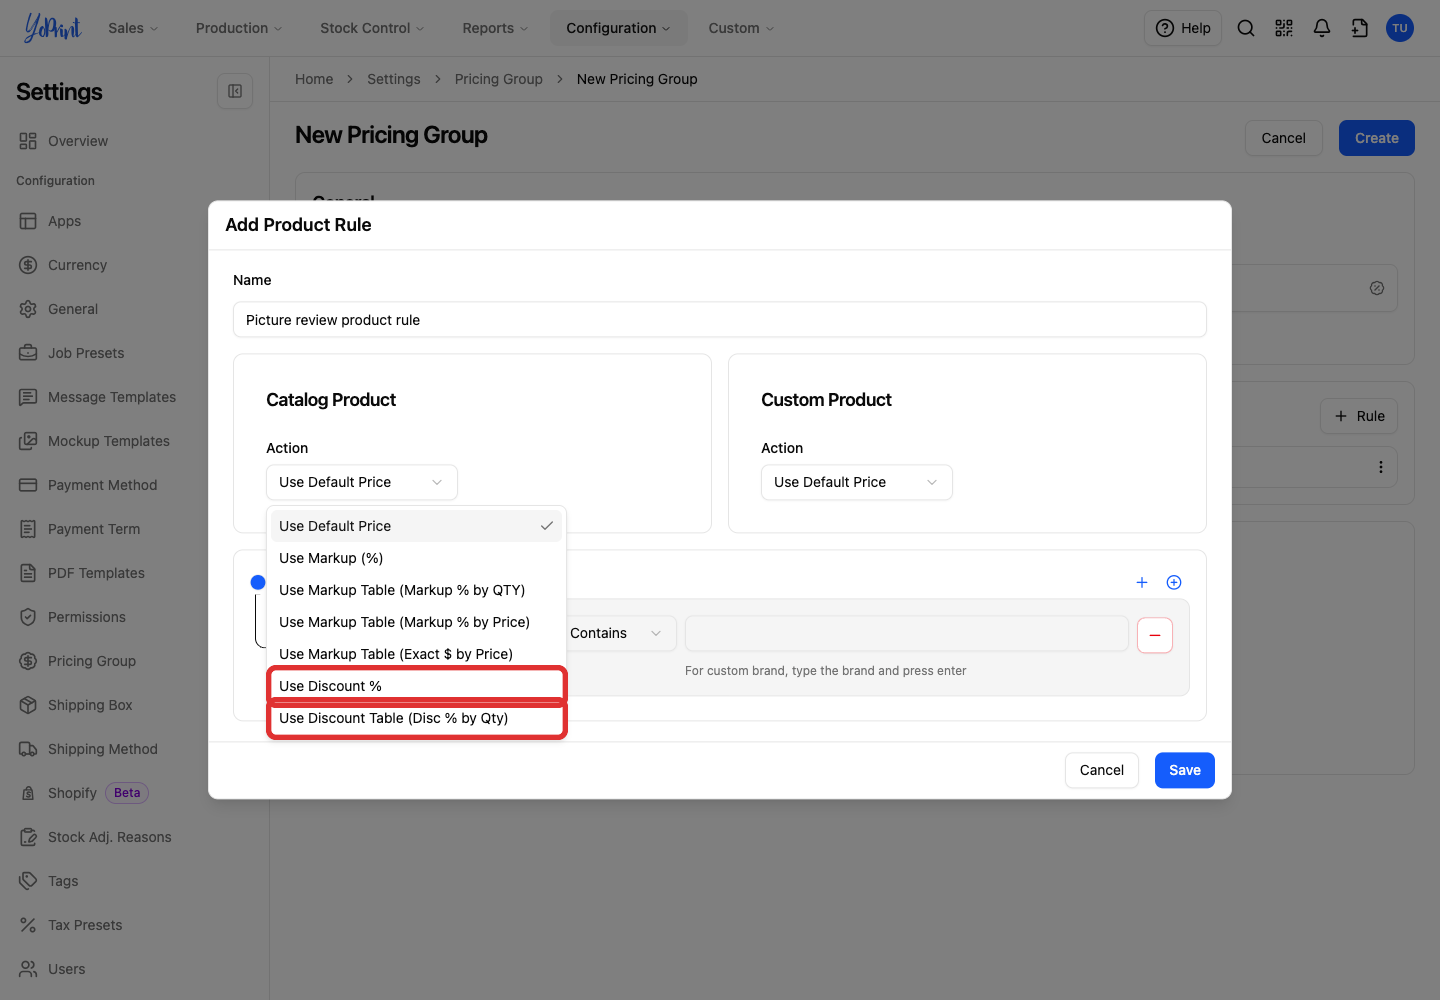
To discount a product, edit or add a product rule, choose Use Discount % for Catalog Product or Custom Product, enter the percentage, add a condition, save the rule, and publish the group.
-
Open the product rule's three-dot More actions menu and choose Edit, or click + Rule to add a new product rule.
-
Under Catalog Product or Custom Product, choose Use Discount % for a flat discount, or Use Discount Table (Disc % by Qty) for quantity tiers.
-
Enter the discount percentage in Percentage.
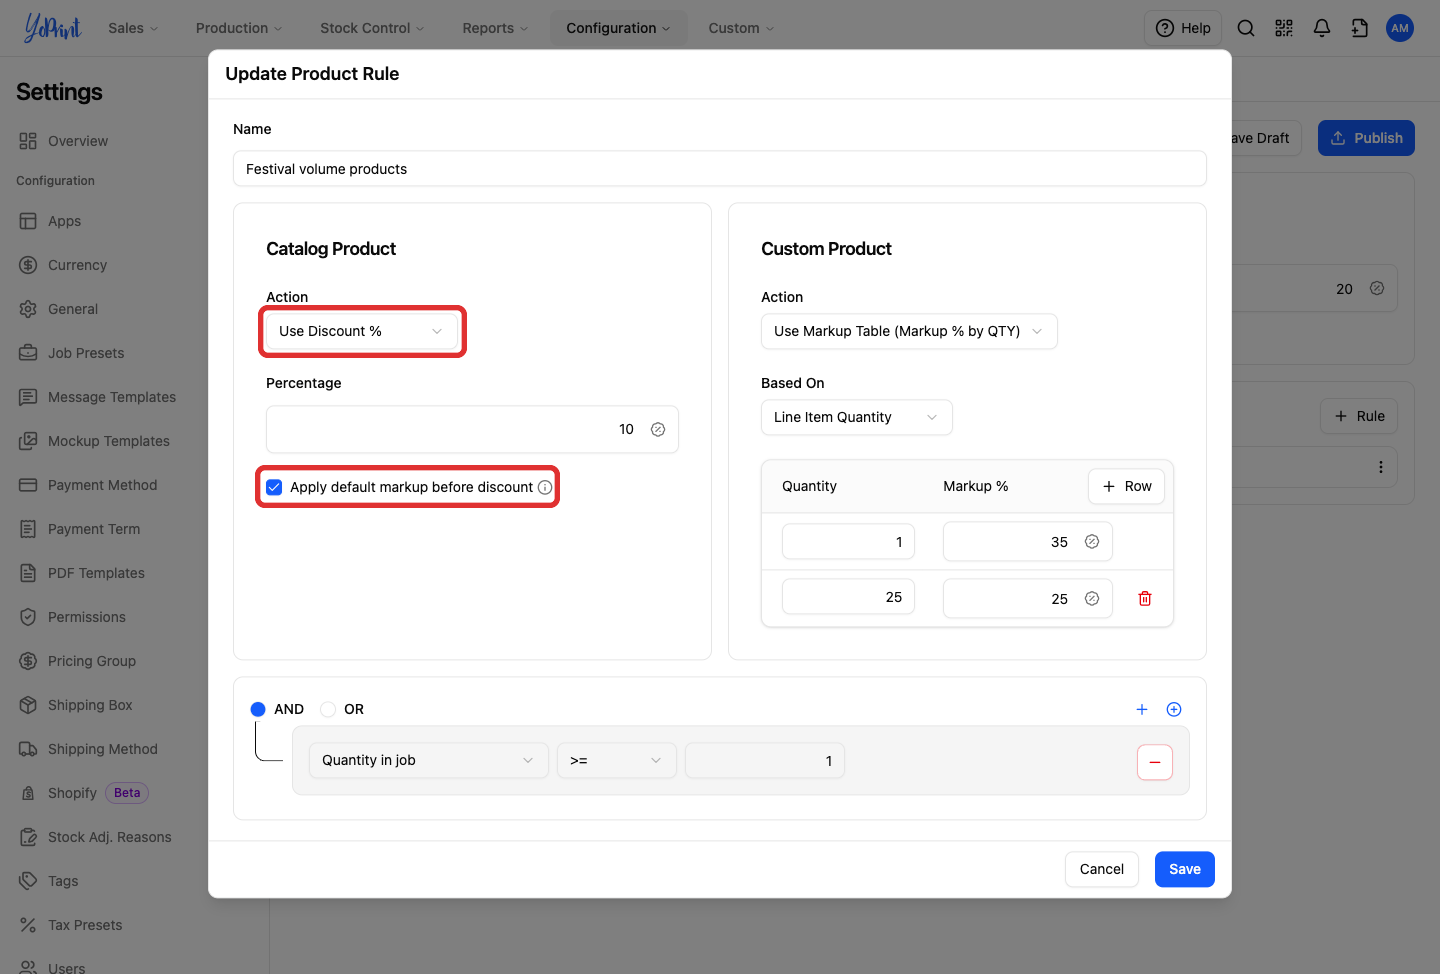
For catalog products, turn on Apply default markup before discount only if you want YoPrint to calculate the default catalog markup before taking the discount. Leave it off to discount the supplier price directly.
For quantity breaks, choose Use Discount Table (Disc % by Qty), choose Based On, and enter the discount at each break.
-
Add at least one condition to define when the discount applies.
-
Click Save in the rule dialog.
-
Click Publish to apply the updated pricing group.
When you finish setting product rules, continue to Add a service markup, or go directly to Save or publish the group.
Add a service markup
-
Check that Enable Service Rules is on.
-
Click + Rule under Service Rules.
-
Enter Service labor markup as the rule name.
-
Choose Add Markup Percentage and enter 15 in Percentage.
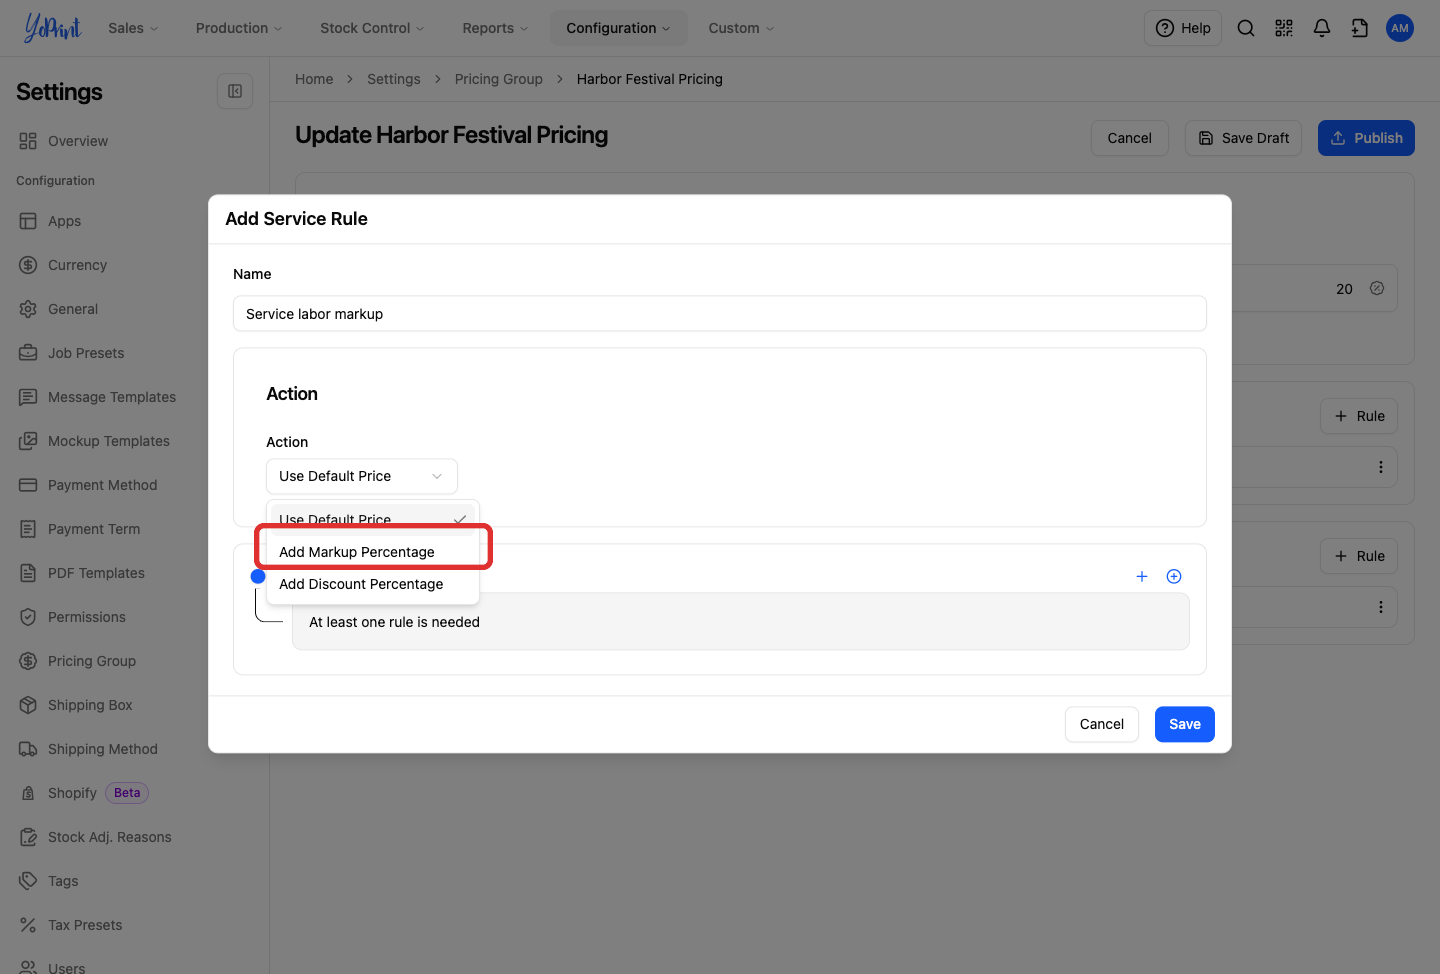
Choose Use Default Price to keep the calculated service price for a matching rule, or Add Discount Percentage to reduce it. To keep the matrix price for every job in this group, leave Enable Service Rules off.
-
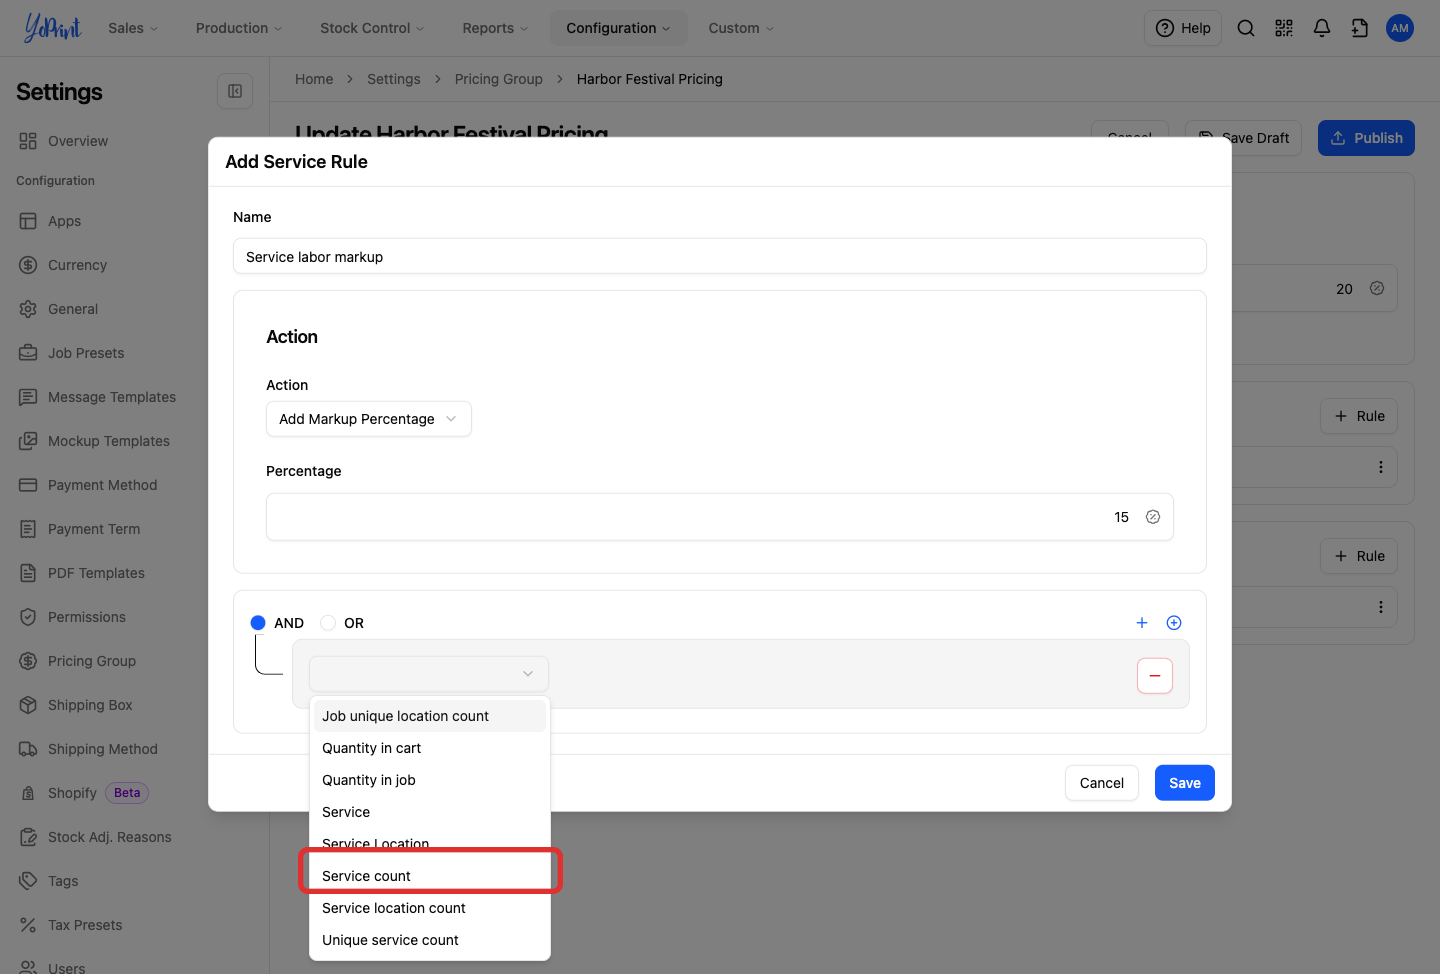
Click the plain + in the condition area and choose Service count.
-
Choose >= and enter 1.
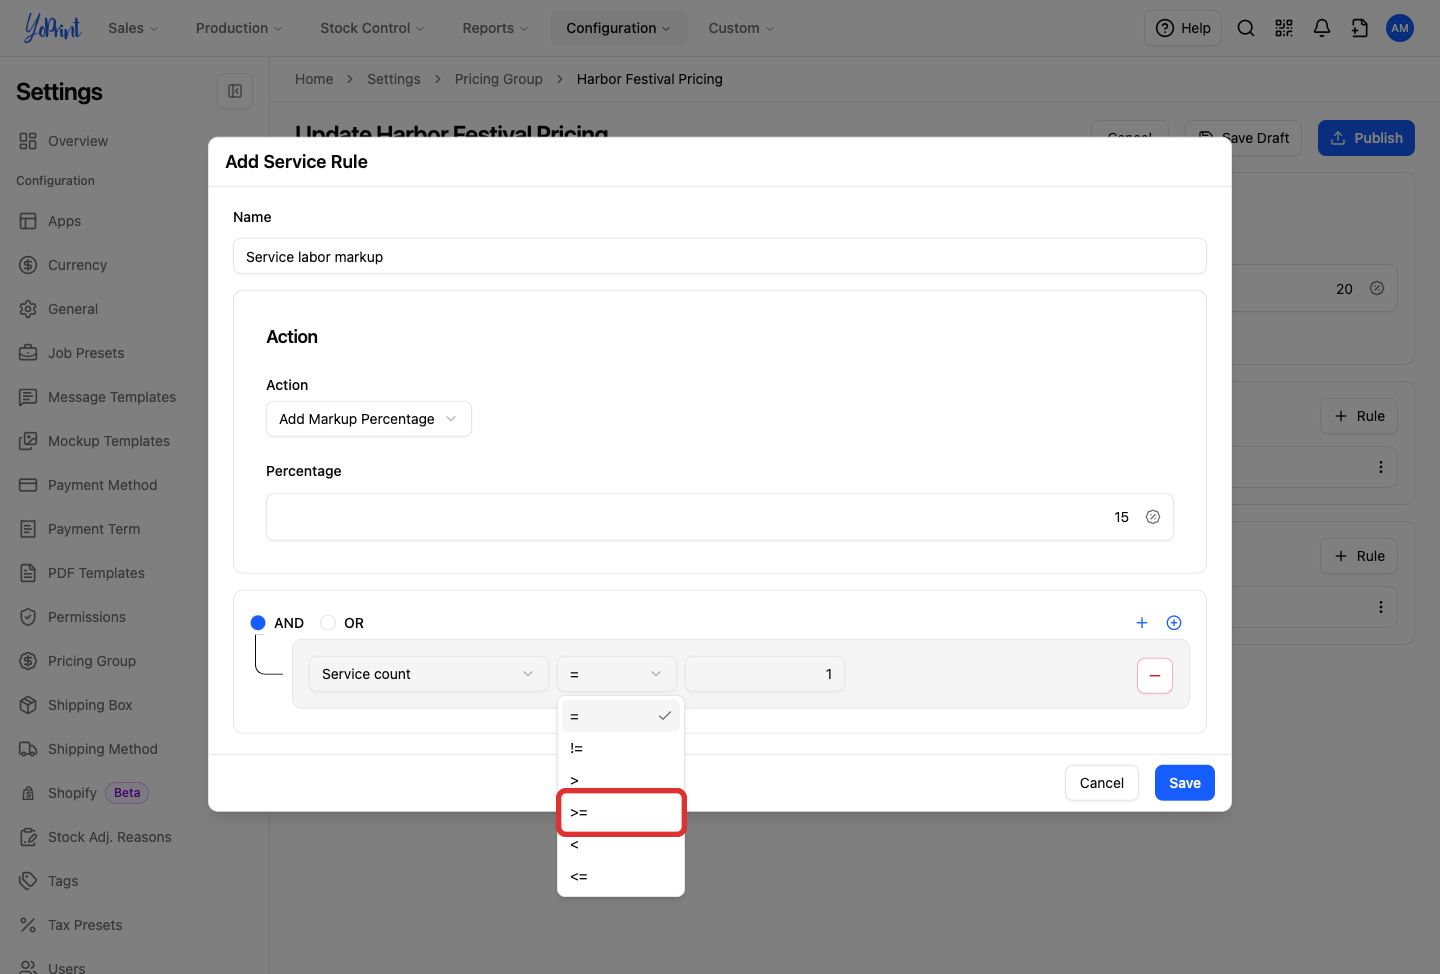
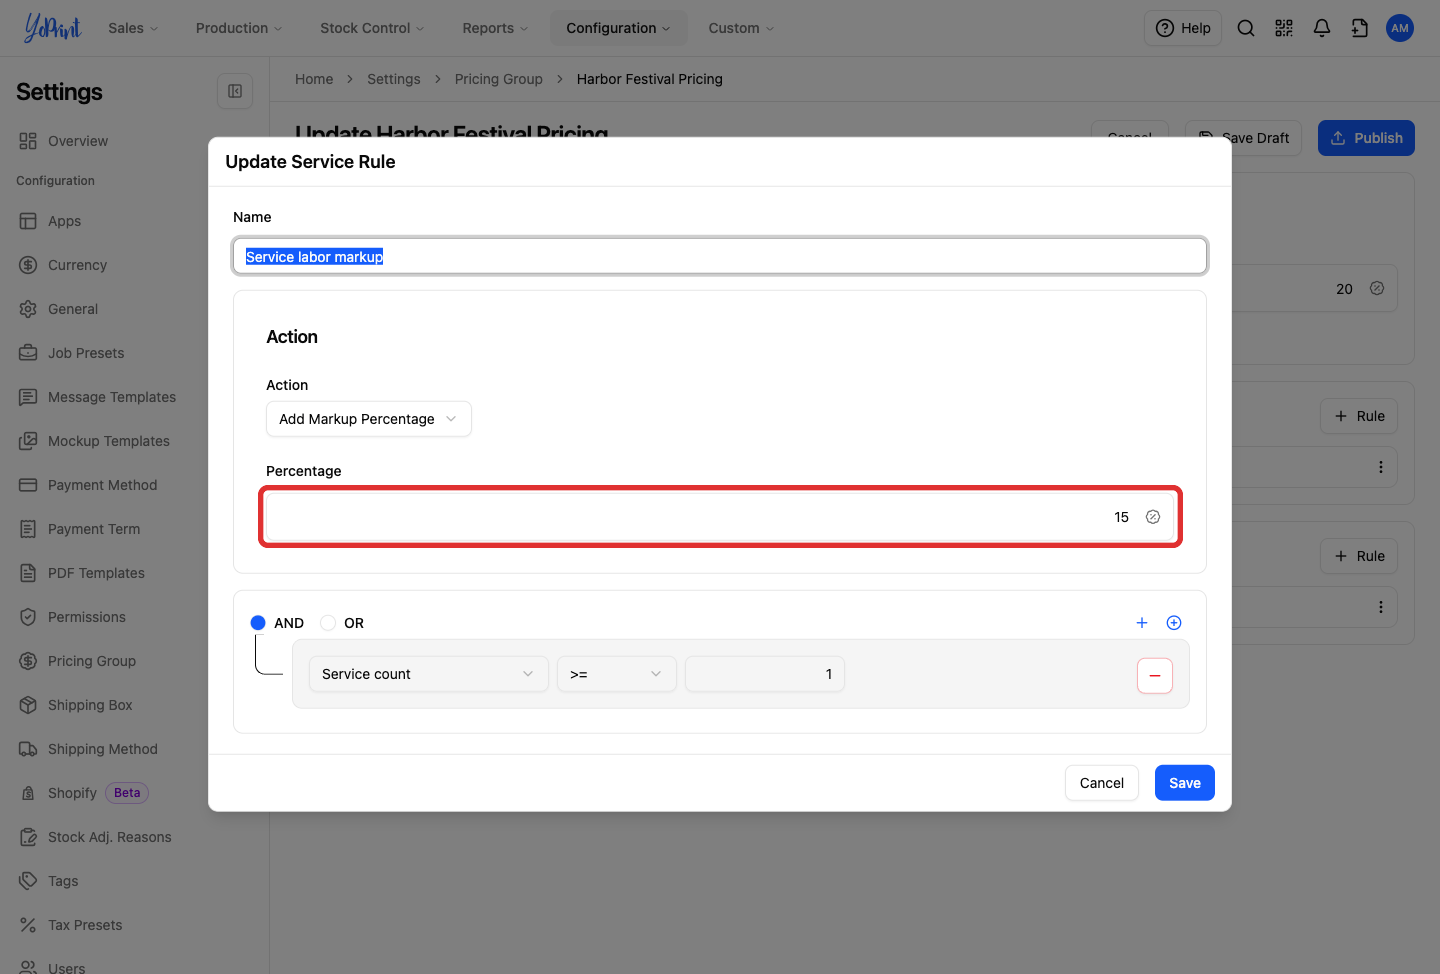
Choose other operators or add more conditions to narrow which services the rule applies to.
-
Click Save.
The service rule adds 15% to the service price calculated from its matrix. With the example matrix, $2.00 becomes $2.30 for 1 to 24 mugs; $1.60 becomes $1.84 from 25 mugs. The service quantity break belongs in the matrix, not in the product markup table.
Choose service conditions and operators
-
Click the condition field dropdown to choose a service attribute.
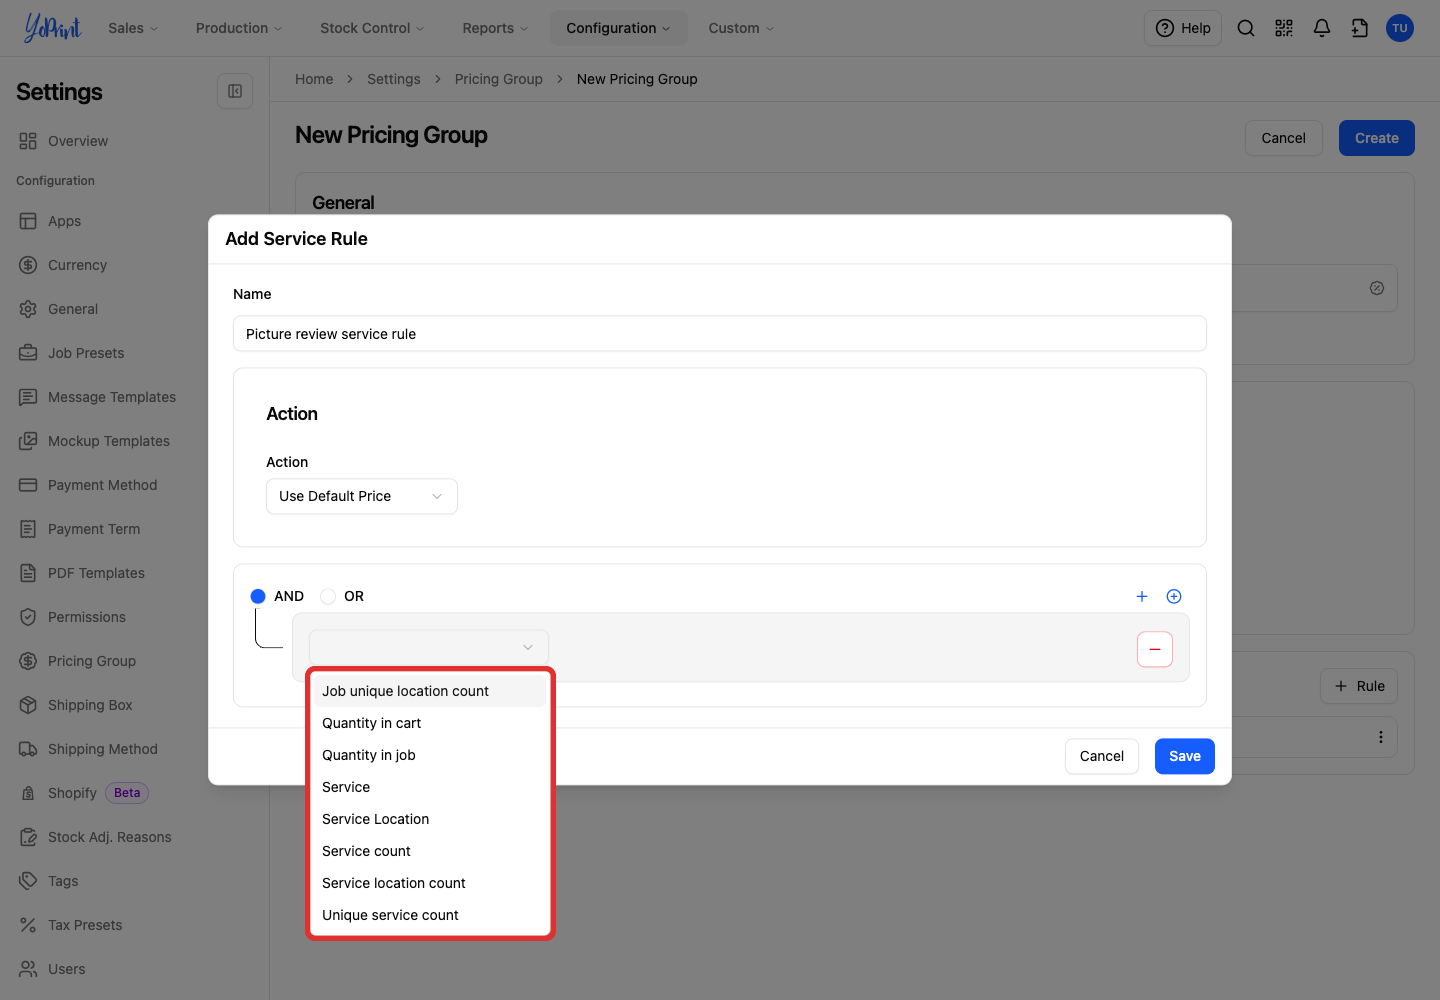
You can choose from eight condition fields in the service rule editor:
- Job unique location count
- Quantity in cart
- Quantity in job
- Service
- Service Location
- Service count
- Service location count
- Unique service count
-
For count conditions, choose an operator from =, !=, >, >=, <, or <=.
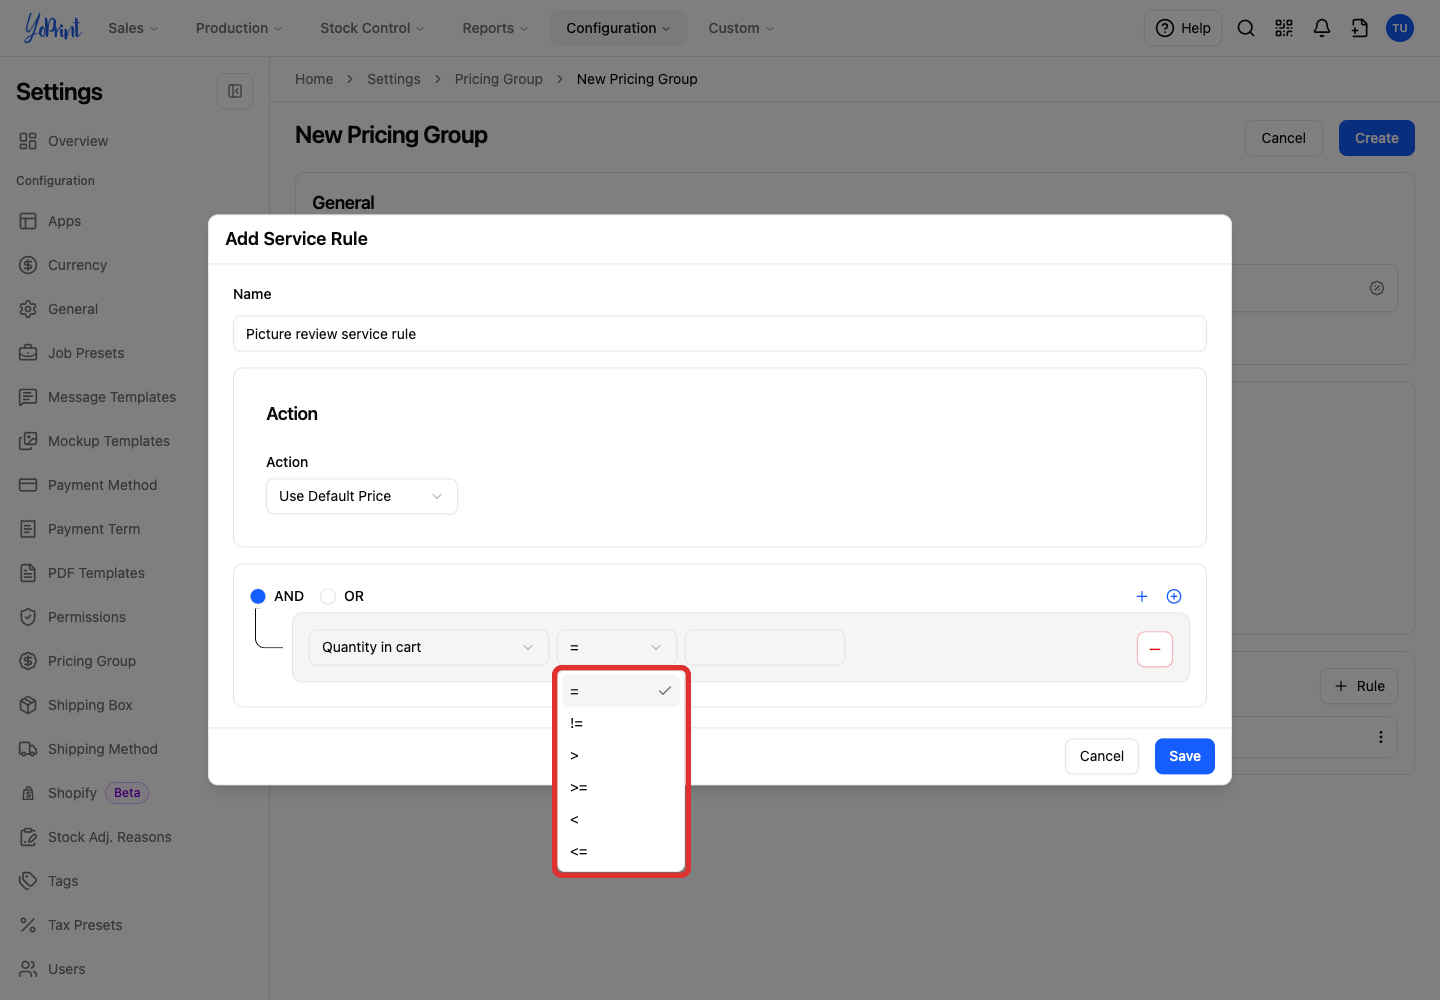
Price and count conditions use =, !=, >, >=, <, <=, while choices such as service, location, brand and product use Contains or Does not contain. For service rules, count conditions compare quantities: =** equals, != does not equal, **> is greater than, >= is greater than or equal to, < is less than, and <= is less than or equal to.
-
For service or location choices, choose Contains or Does Not Contain.
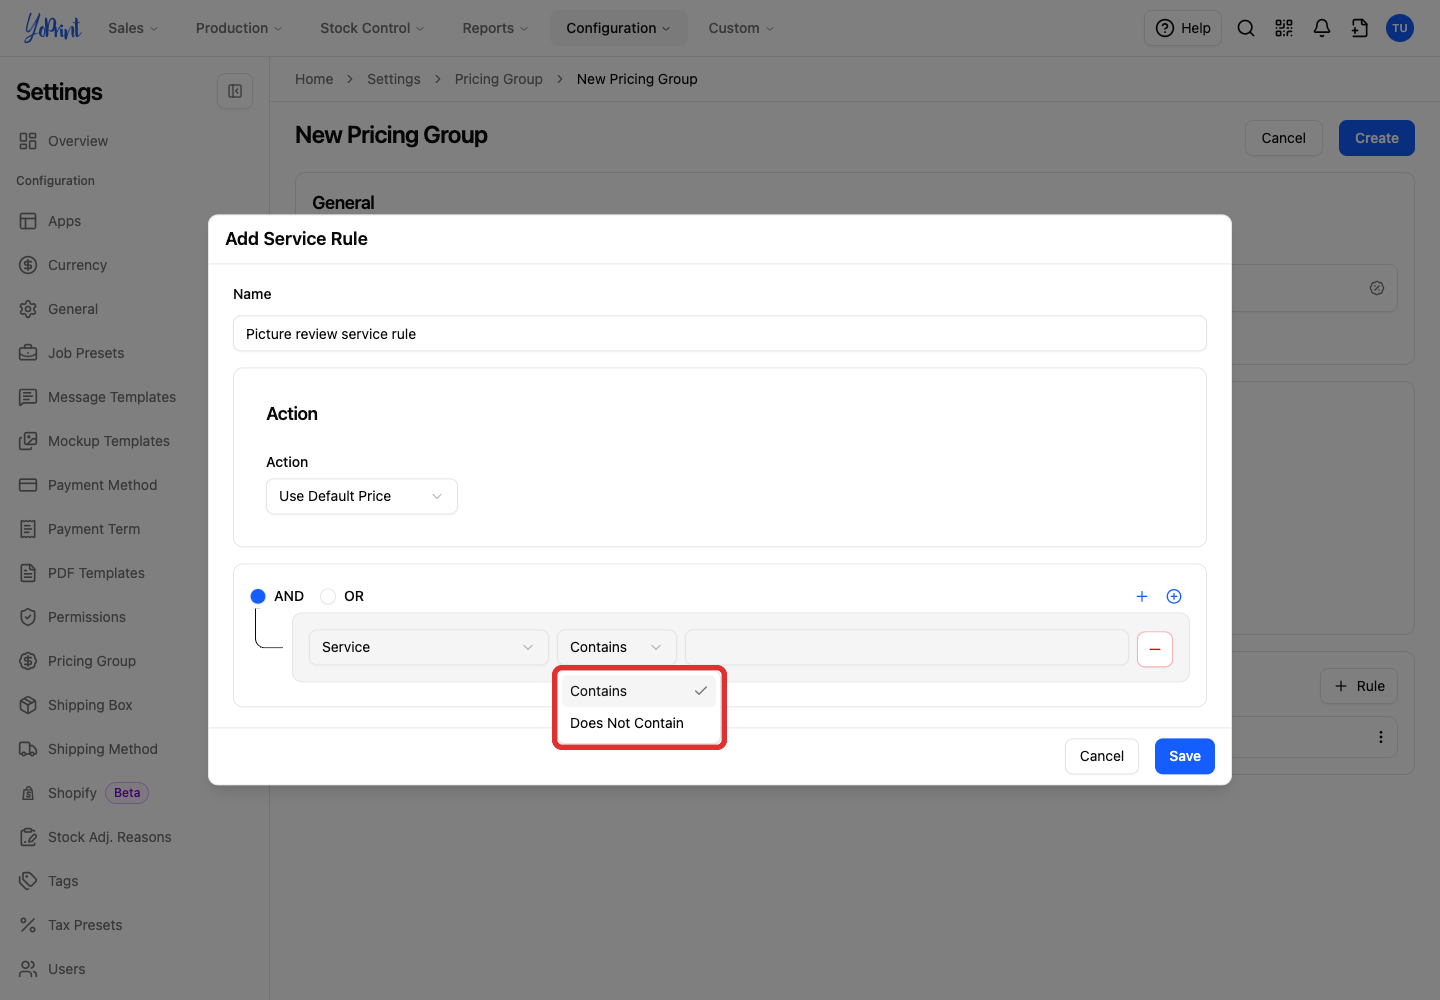
Service and location choices use Contains to match text included in the name, or Does Not Contain to exclude it.
Discount a service
To discount a service, edit or add a service rule, choose Add Discount Percentage, enter the percentage, add a condition, save the rule, and publish the group.
- In Service Rules, open the rule's three-dot More actions menu and choose Edit, or click + Rule to add a new service rule.
- Under Action, choose Add Discount Percentage.
- Enter the percentage in Percentage.
- Add at least one condition to specify which services receive the discount.
- Click Save in the rule dialog.
- Click Publish to apply the updated pricing group.
Save or publish the group
-
Check the rules in each list. YoPrint uses the first matching product rule for each product line and the first matching service rule for each job. It does not add every matching rule together.
If you have several rules, drag more specific rules above broader ones. Place a specific product exception above a rule that matches every job with a quantity of at least 1.
-
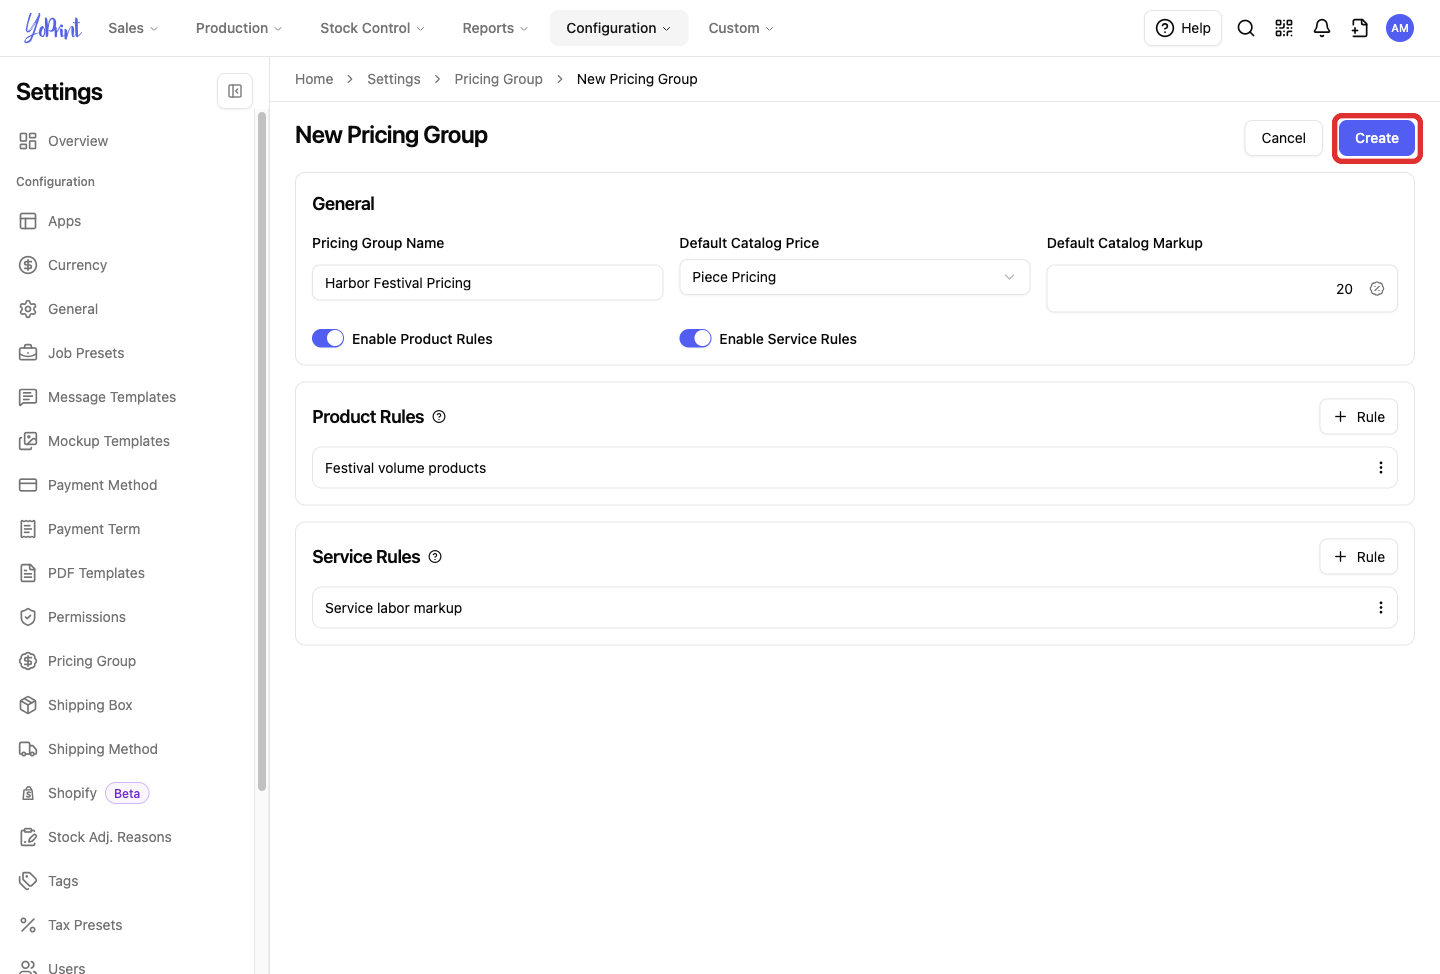
For a new group, click Create.
-
When editing an existing group, click Publish to apply your changes to the group.
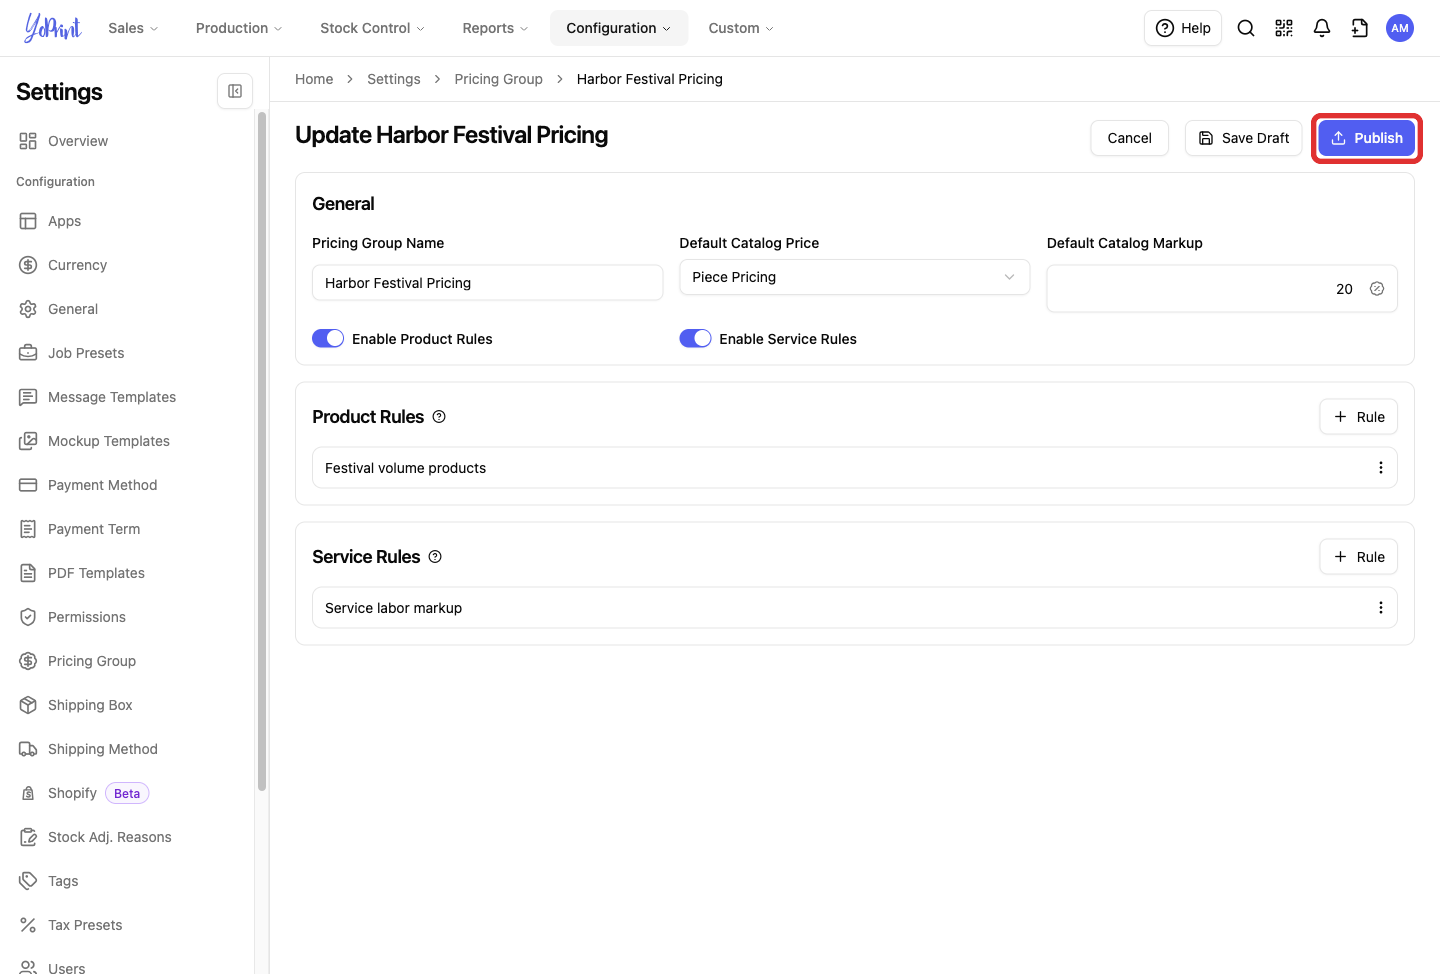
To finish later, click Save Draft. This saves the unfinished configuration without publishing it. When you reopen the group through More actions → Edit, choose Resume in the Draft Confirmation dialog to keep working on that draft. Choose New Draft only if you want to discard the saved draft and start again from the published group.

- Return to Pricing Groups and check that your group is Enabled. You can now select it on a quote or sales order.
Group and rule availability depends on your plan and permissions. If the controls are unavailable, check your access before continuing.
Apply the group and check the result
-
Open the quote or sales order in its editable view.
-
In Overview, click the pencil beside Pricing Group.
-
Select Harbor Festival Pricing, then click Save.
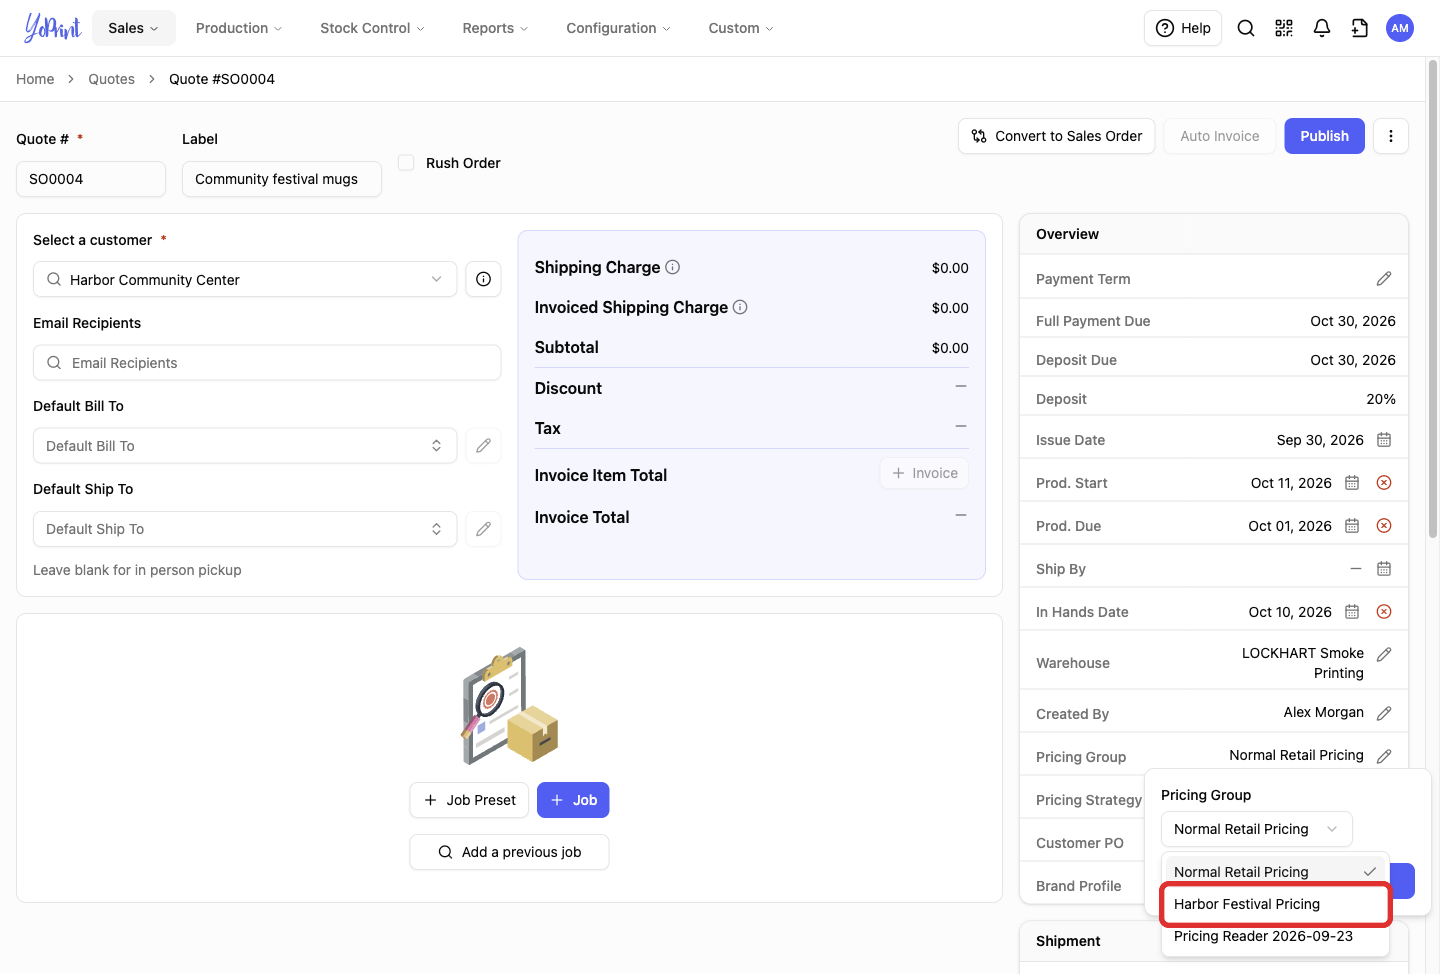
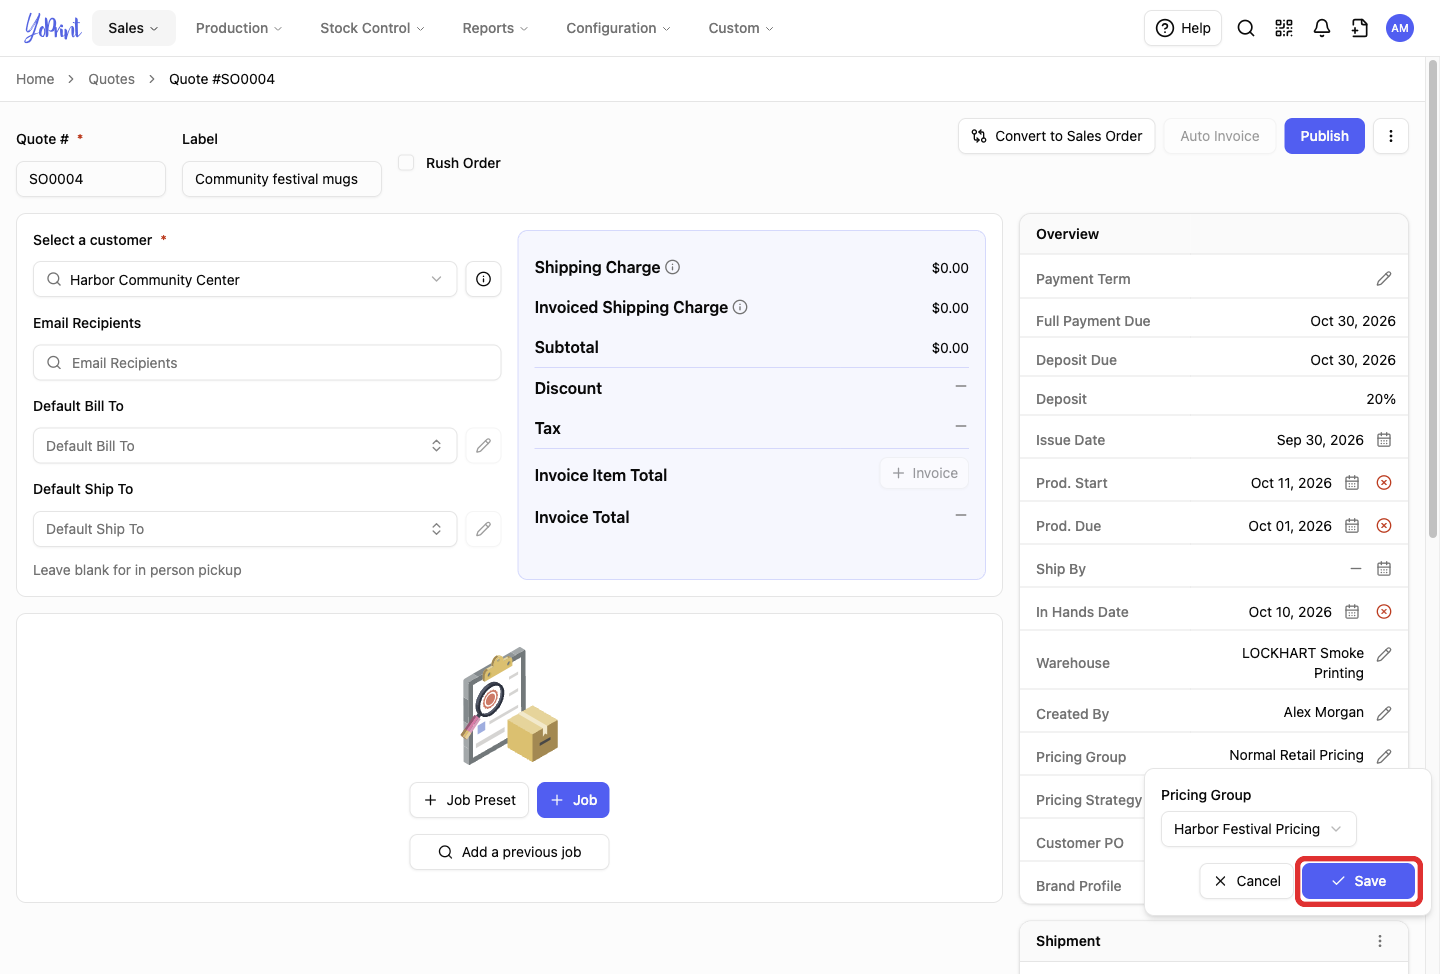
If the quote already has a job you want to use, open it and check its service instead of creating another. Then continue at the + Product step below.
-
Click + Job and enter Festival mugs as the Job Name.
-
Under Services, click + Service and choose Festival Printing.
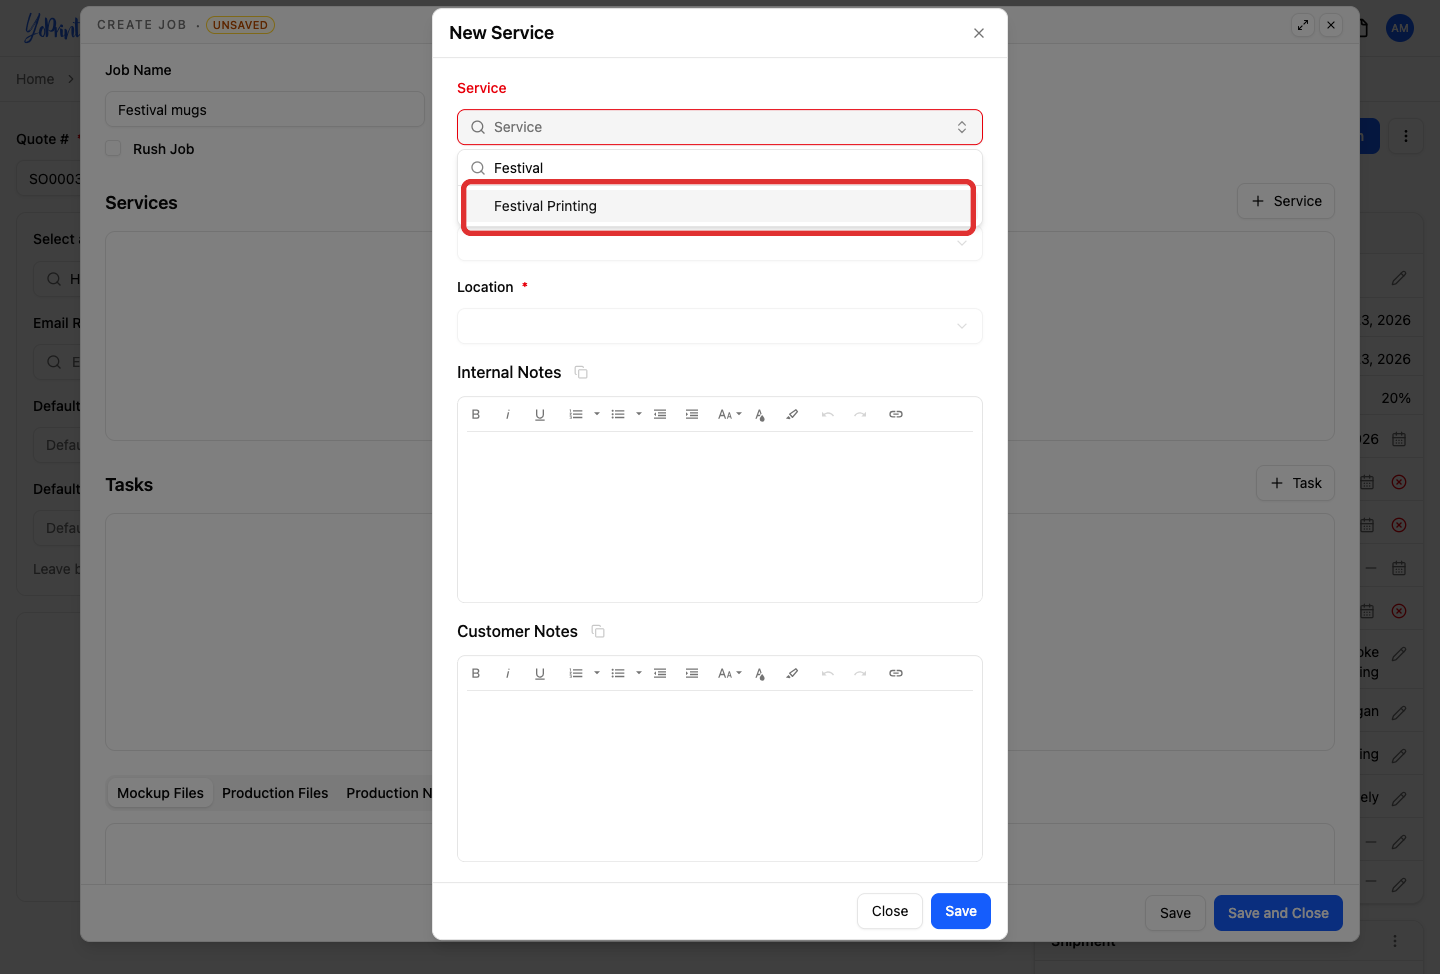
-
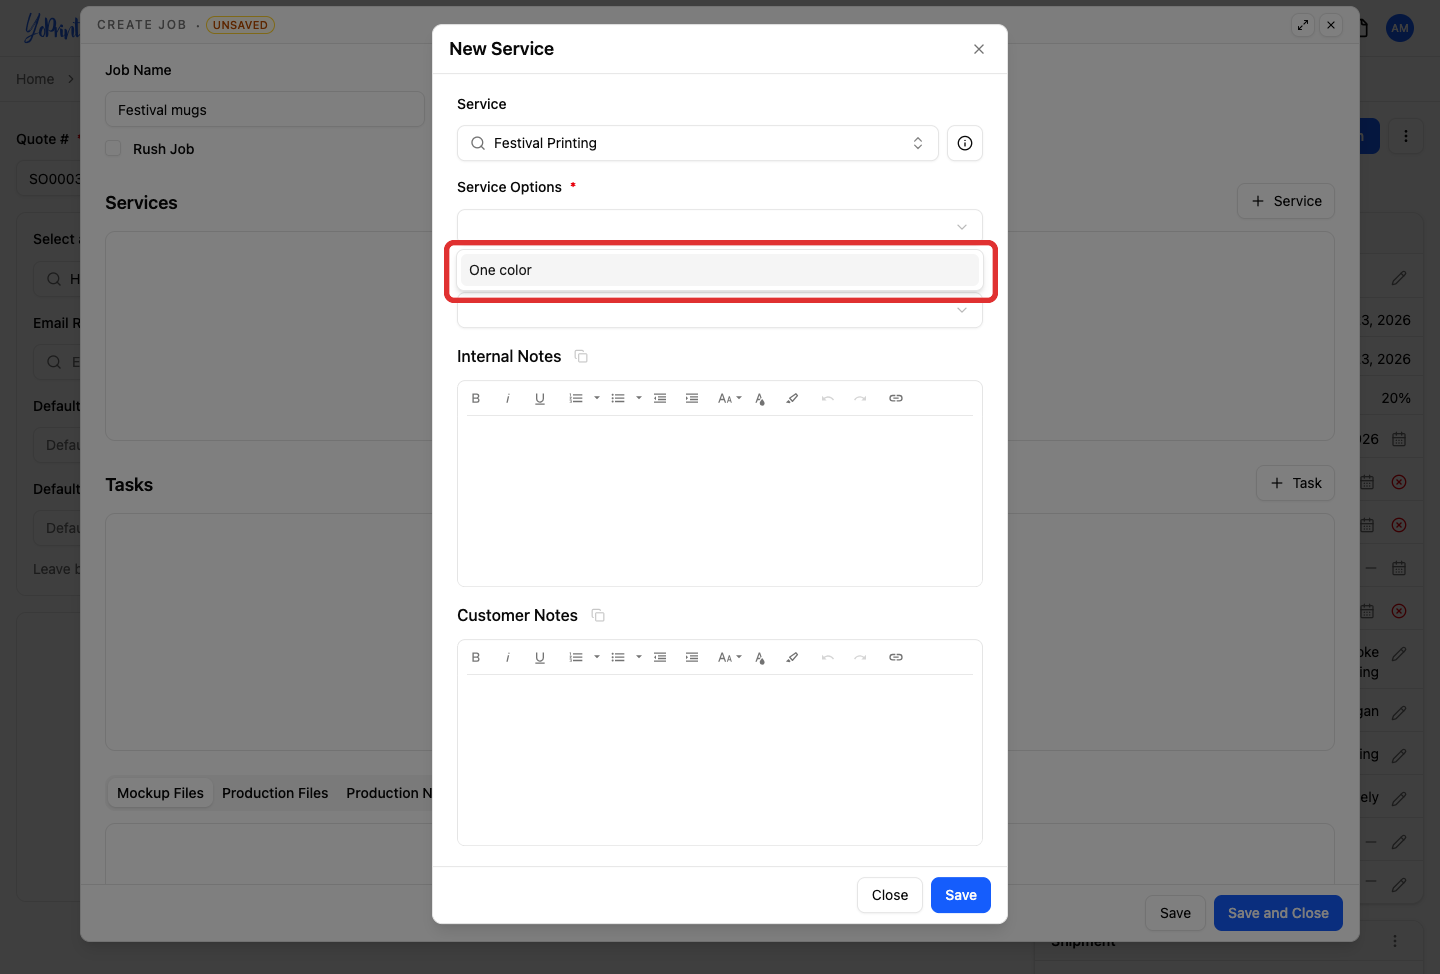
Choose One color under Service Options.
-
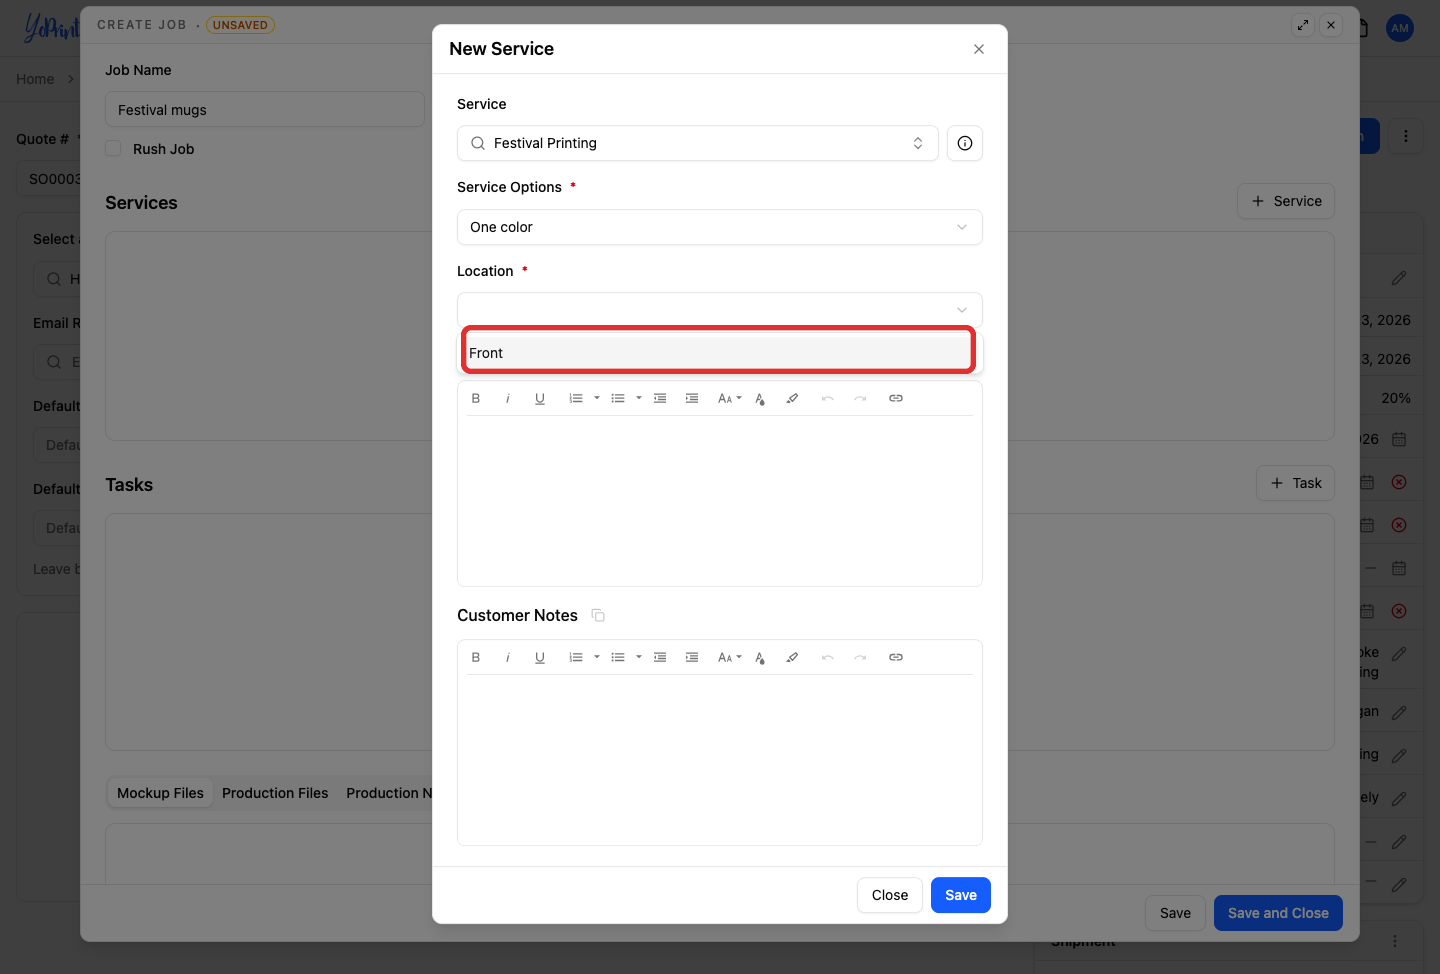
Choose Front under Location.
-
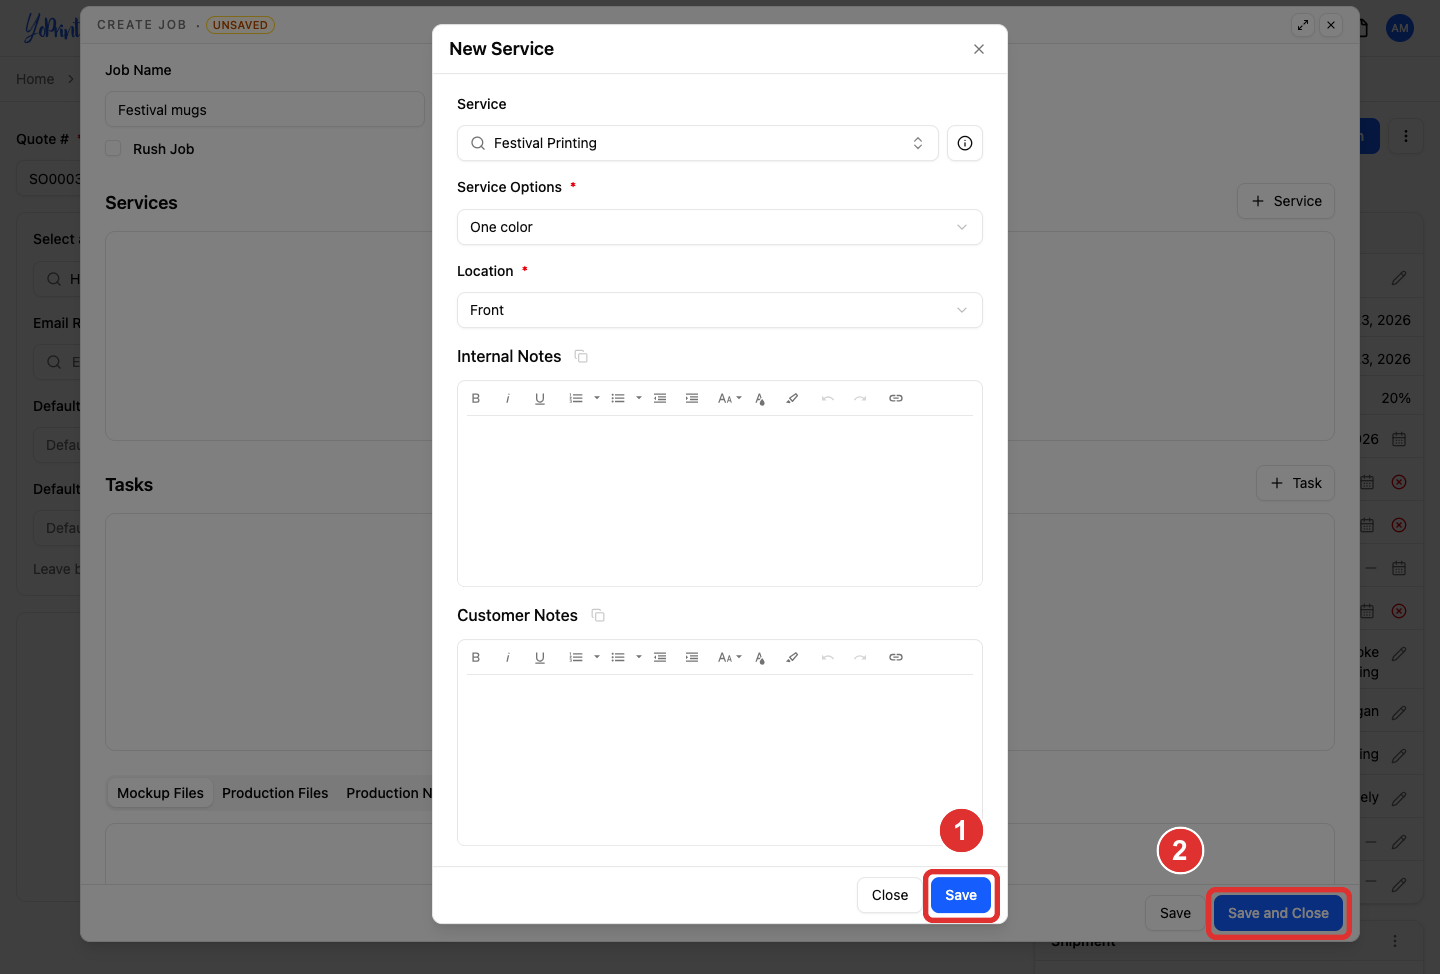
Click Save in the service dialog, then Save and Close in the job dialog.
-
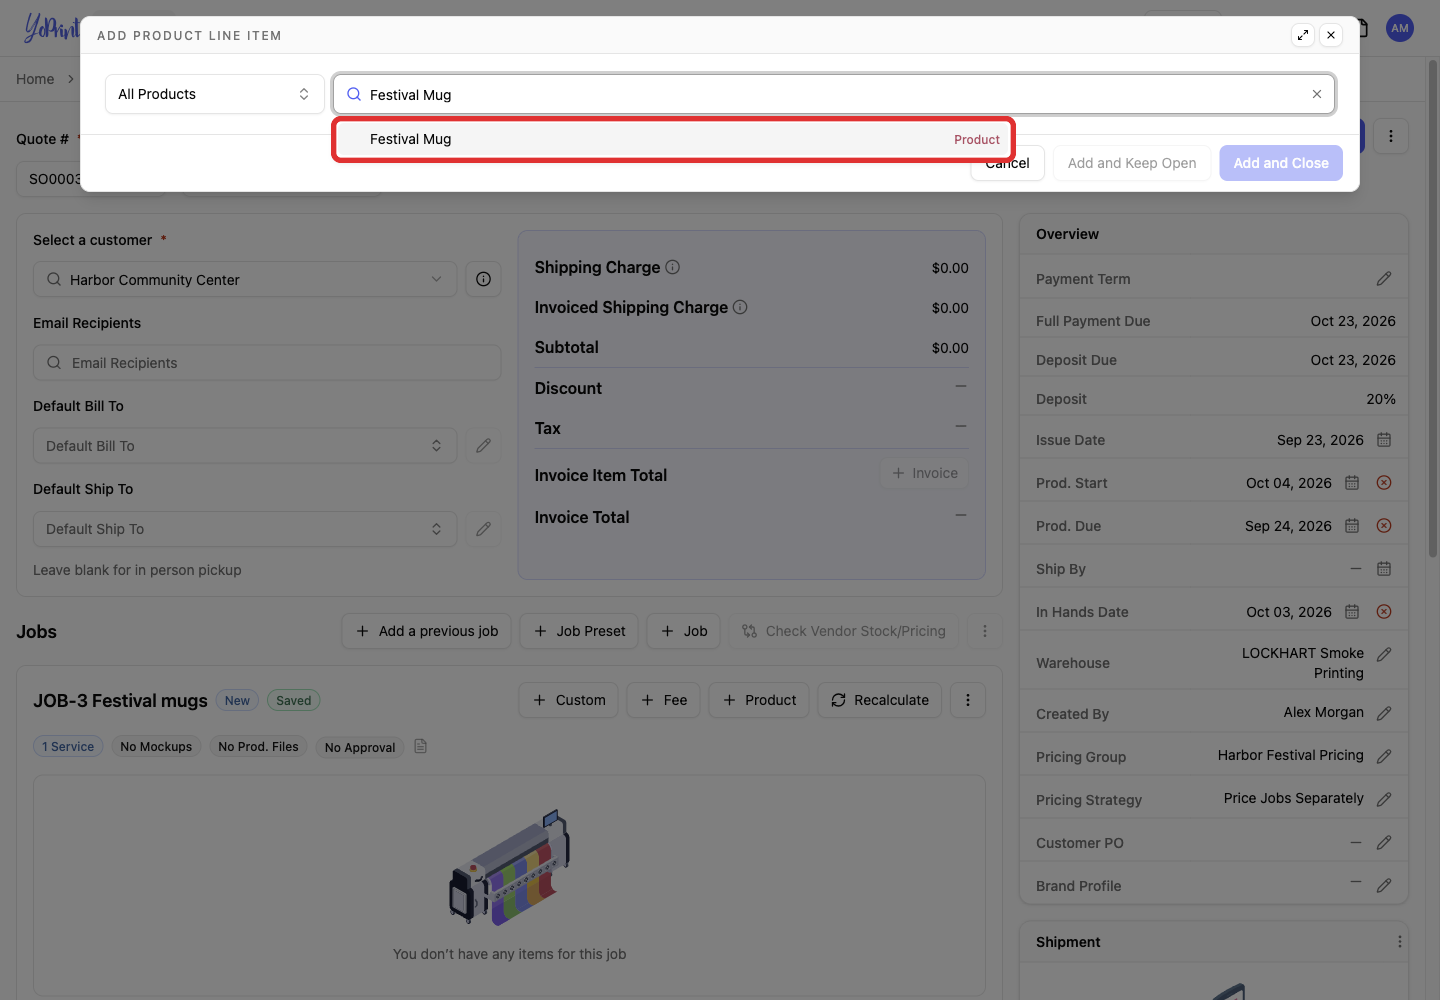
Click the job's + Product button and select the saved Festival Mug.
-
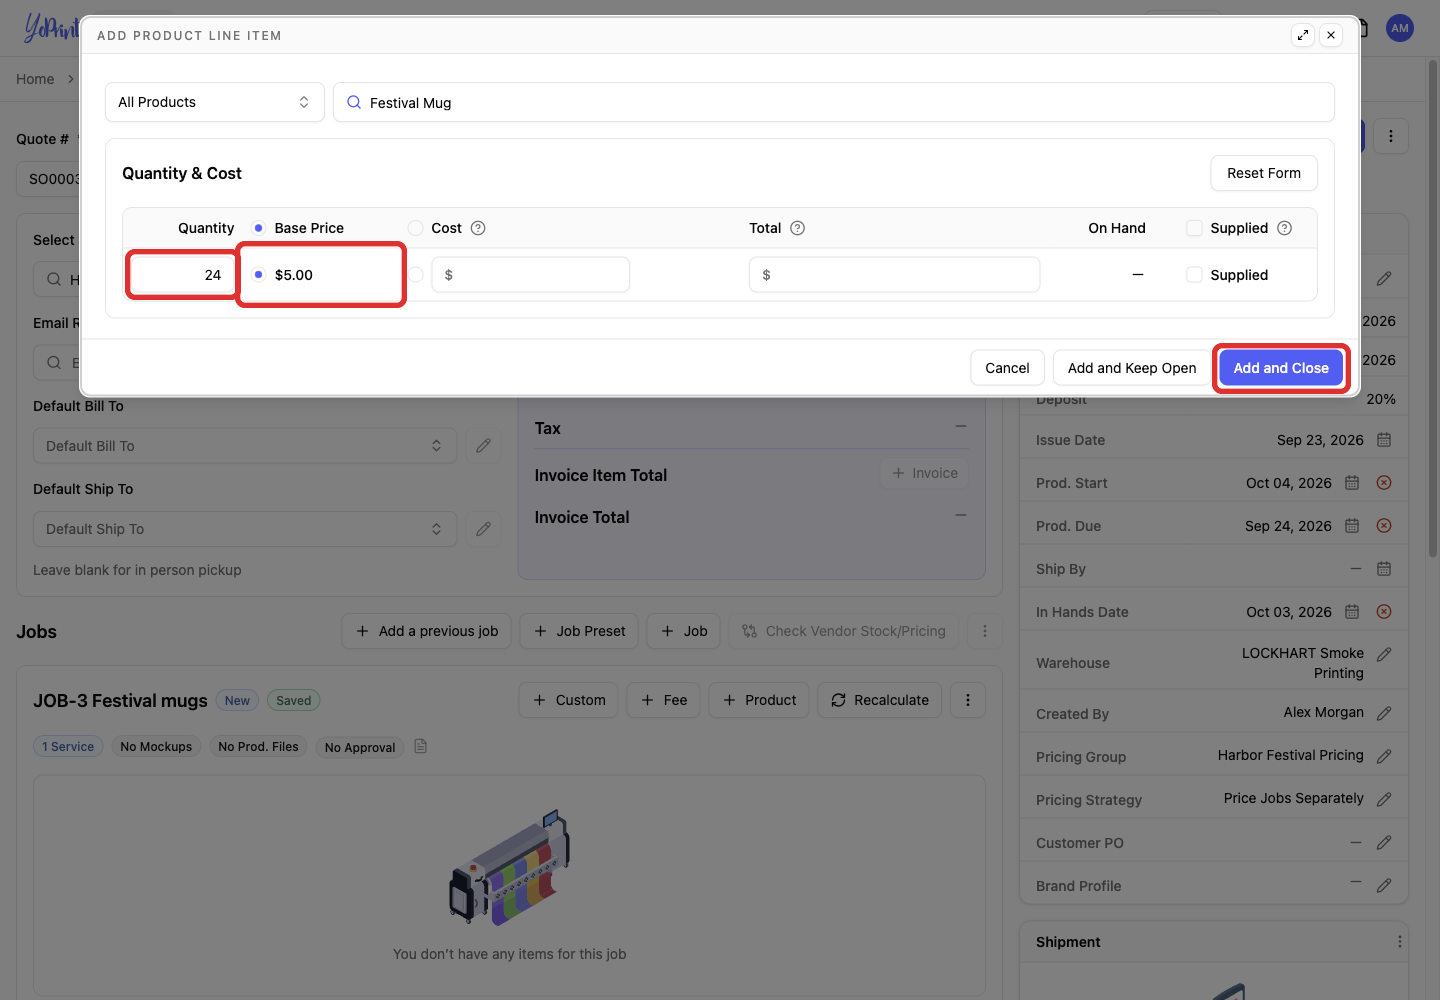
Enter a quantity of 24, keep Base Price selected at $5.00, then click Add and Close. Do not override the product or combined unit price.
-
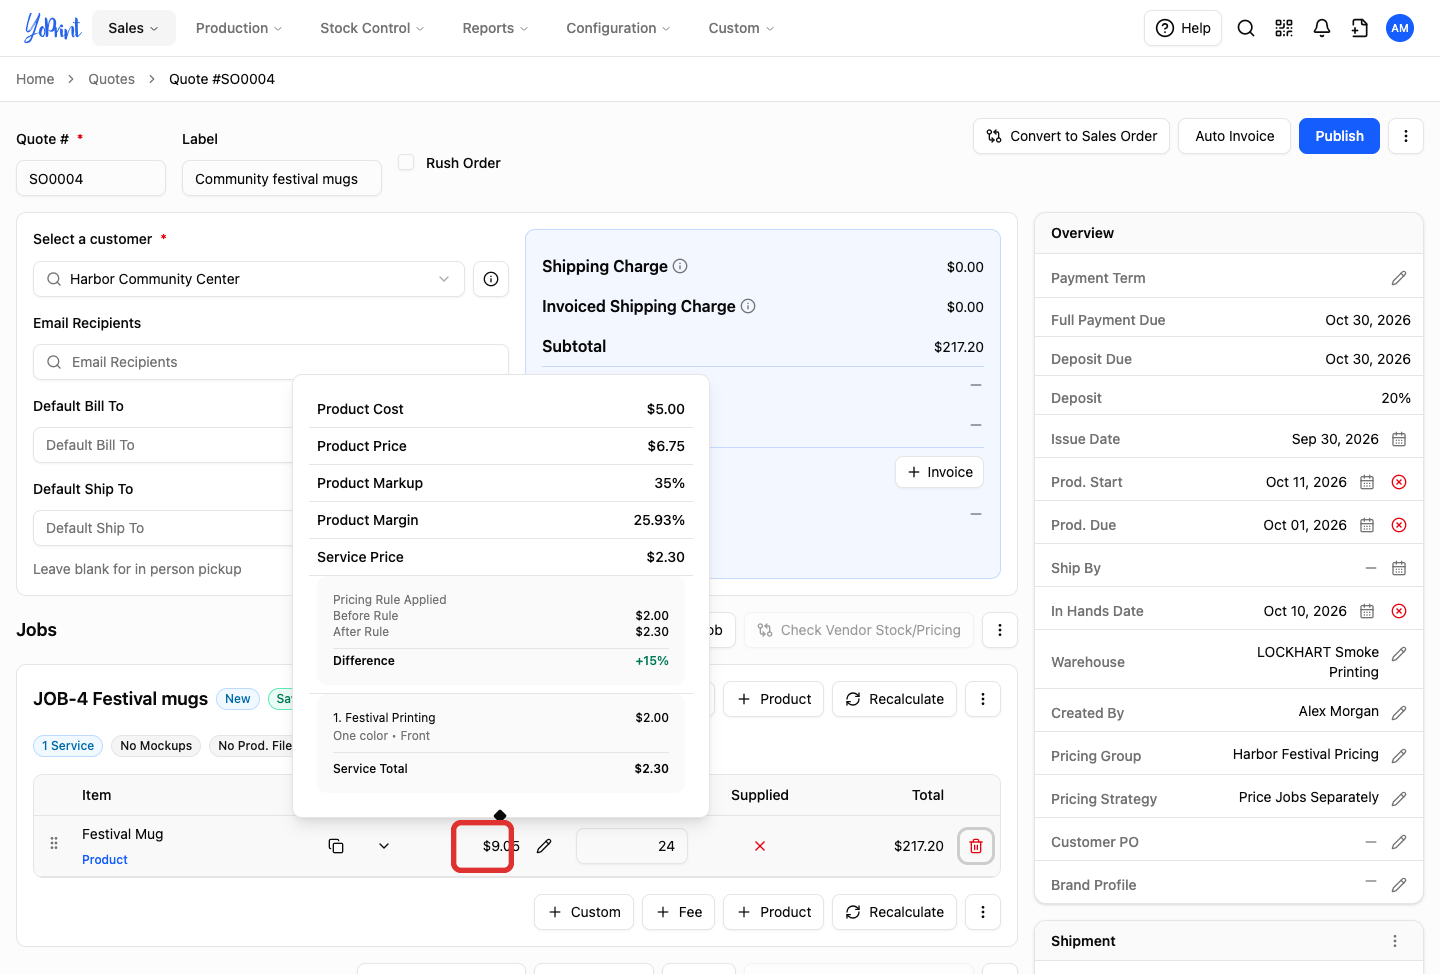
Wait for the job to finish saving, then hover over its Unit Price. Check Product Cost, Product Price, Product Markup, and Service Price. The service breakdown shows the price before and after the service rule.
-
Change the quantity to 25, leave the quantity field, and wait for the updated price. Hover over Unit Price again.
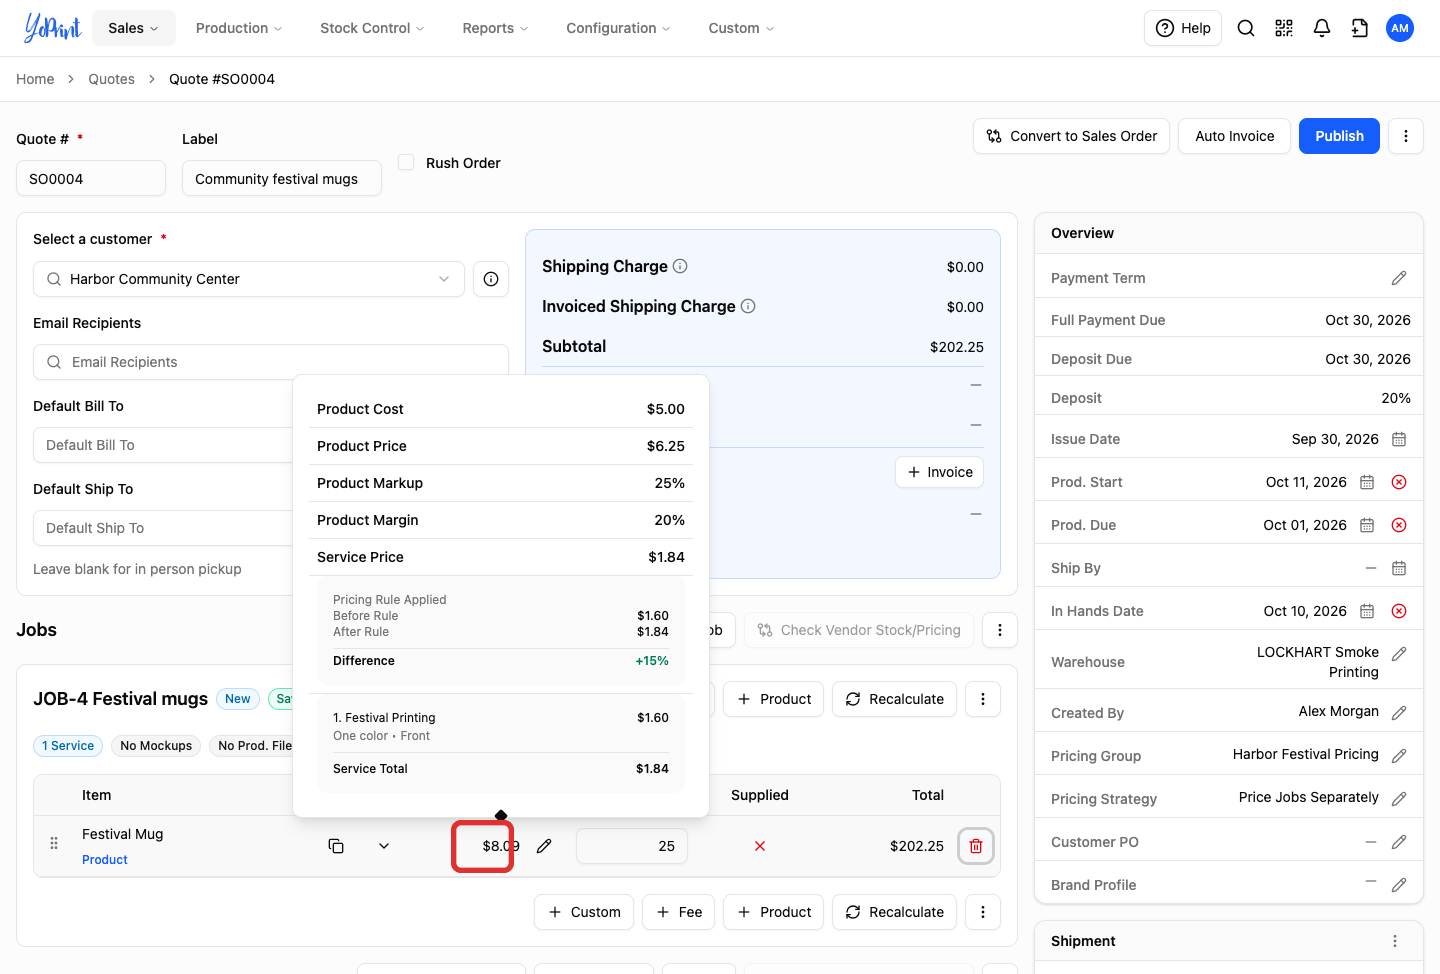
Price 24 mugs 25 mugs Product price per mug $6.75 $6.25 Service price per mug $2.30 $1.84 Combined unit price $9.05 $8.09 Subtotal $217.20 $202.25 Both tiers change at 25 in this example, so 25 mugs have a lower subtotal than 24. These are example prices, not suggested pricing for your shop. The subtotals exclude order discounts and tax.
If the numbers differ, check the selected group, the product's starting price, Based On, rule conditions, and rule order. Check the service matrix separately. A manually overridden price or customer-supplied product can bypass the normal product rule.
Remove an unwanted service markup
- Open Configuration → Settings, choose Pricing Group, open the group's three-dot More actions menu, and choose Edit. If prompted, click Resume.
Turning off Enable Service Rules and saving or publishing the group deletes the group's stored service rules. Turning the switch back on later shows an empty section, though it does not remove your service definition or its pricing matrix. To keep a rule for later instead of deleting it, open the rule's three-dot More actions menu, choose Edit, set Action to Use Default Price, click Save, and then click Publish.
-
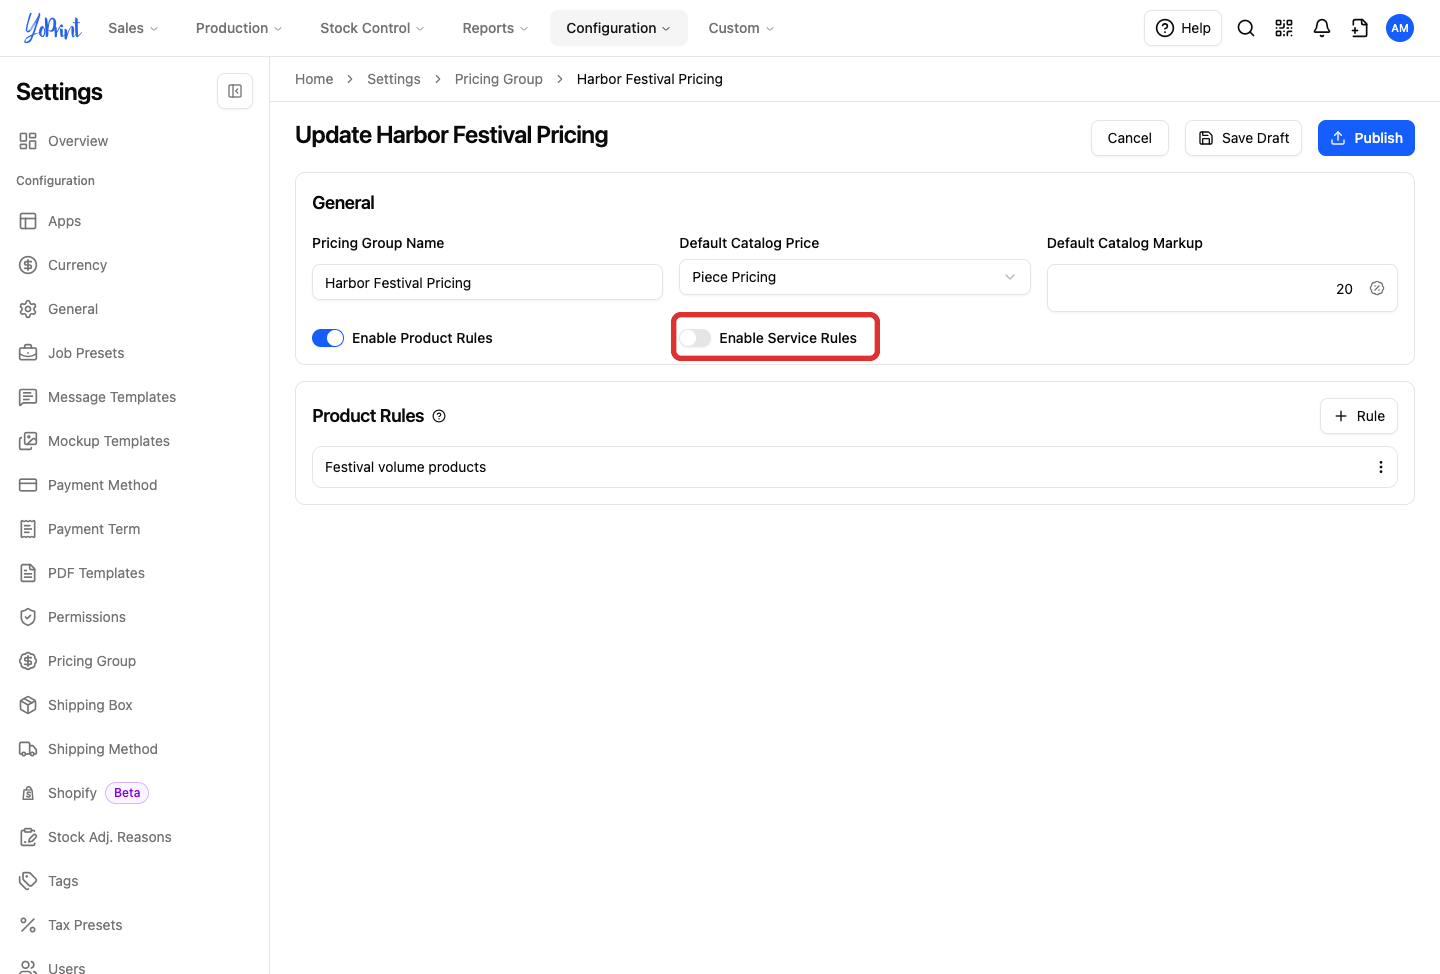
Turn off Enable Service Rules. Keep Enable Product Rules on if you still want the product markup.
-
Click Publish.
-
Return to the editable quote or sales order. In Overview, click the pencil beside Pricing Group, keep the group you edited selected, and click Save to reapply the group.
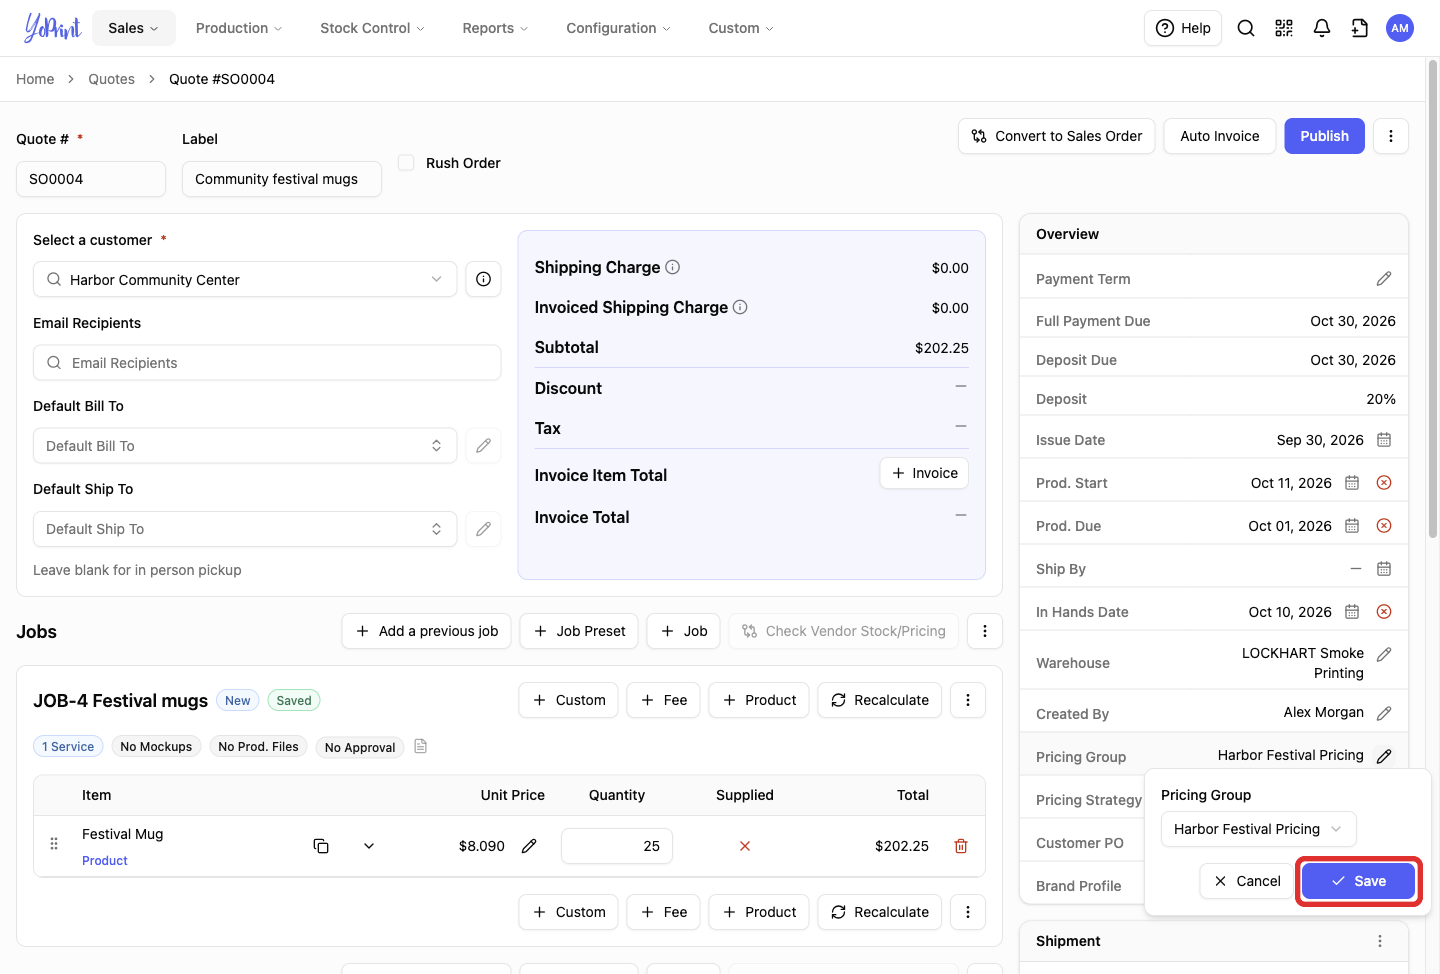
You must reapply the group by saving it in Overview to update existing lines. Clicking Recalculate only recalculates line totals from current values and does not re-run pricing group rules.
-
Hover over Unit Price and check the breakdown. In the 25-mug example, Product Price stays at $6.25, while Service Price returns to the matrix price of $1.60. The combined unit price is $7.85, and the subtotal is $196.25.
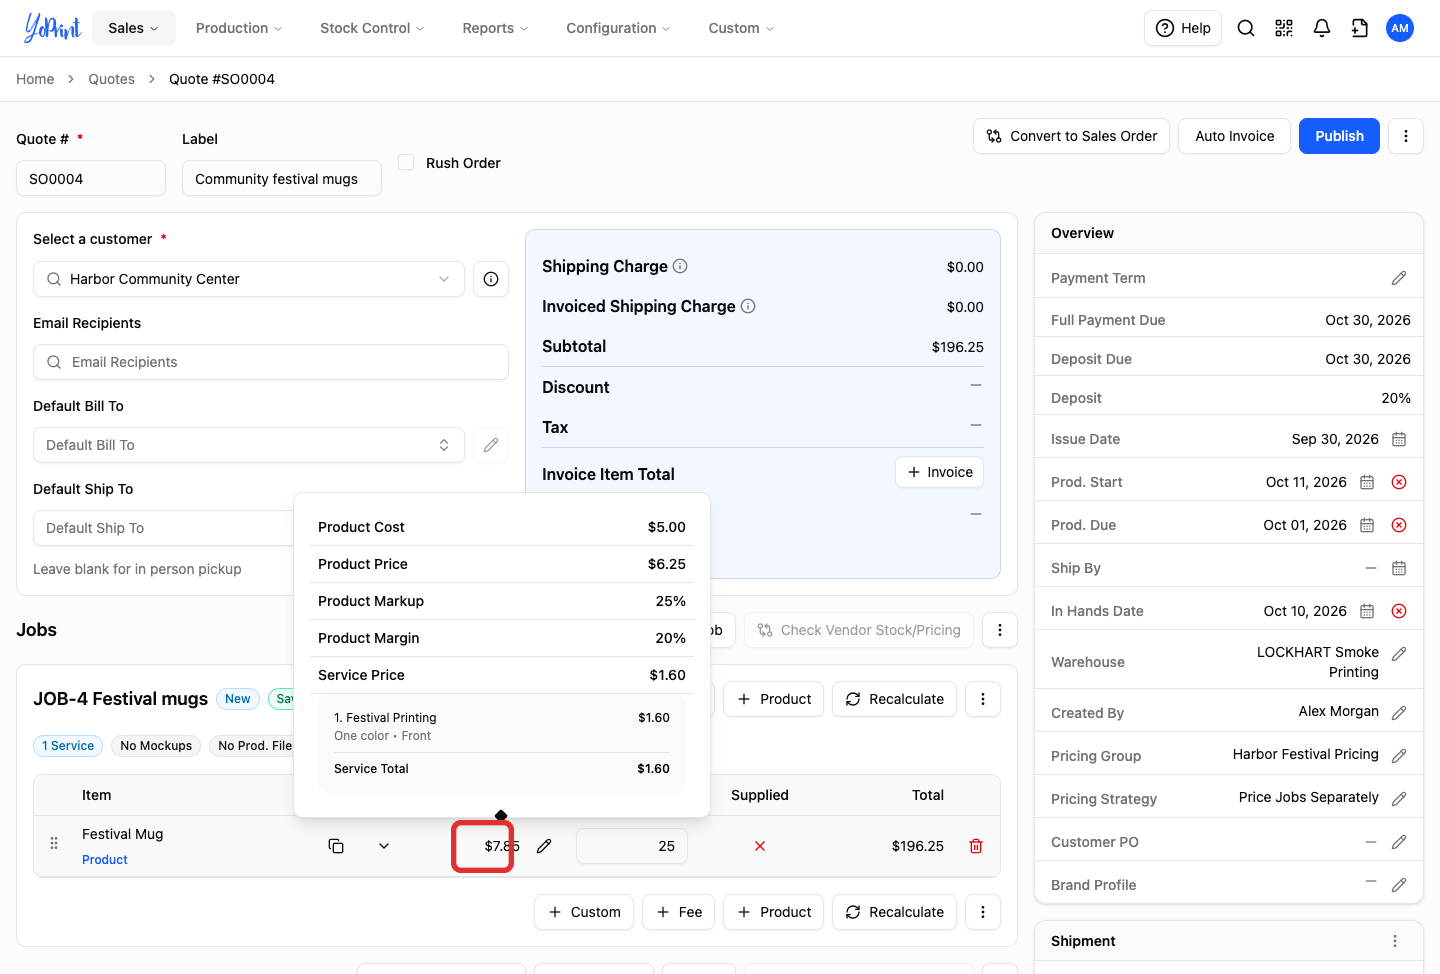
If the price breakdown still shows an old rule message, refresh the page and reopen the quote after saving, then check again. Confirm the amounts before continuing.
To adjust a percentage or tier instead of removing rules, open that rule's More actions → Edit menu, change it, click Save, then Publish the group. Reapply the group in the quote's Overview panel and check the result again.